Twittwilly
About Twittwilly

Twittwilly's Achievements
0
Reputation
-
The Solution for Seagate 7200.11 HDDs
Twittwilly replied to Gradius2's topic in Hard Drive and Removable Media
Oh yes, redundancy is a good thing. That has already been taken care of. I was thinking back to the number of issues I've had over the past couple of years with various name brand drives and went ahead and made a couple of copies of the restoration files to DVD and an external HD. As for the Seagate, I wouldn't trust my particular drive again under any circumstances. I don't need it for storage. I have a few external HDs. Since I own a degausser, that is the only way to go for me. -
The Solution for Seagate 7200.11 HDDs
Twittwilly replied to Gradius2's topic in Hard Drive and Removable Media
Just to let you guys know, my backup and restoration to a new drive of the dreaded Seagate Barracuda clone, using Bart PE/DriveImage XML and VMware VMserver 2.0 software, was completed successfully. Fact of the matter is that I was somewhat surprised at just how well it went. As I previously mentioned , after the firmware repair the Seagate booted up very slowly. Therefore, I was expecting to have to wait for a bit after restarting with the BartPE/DriveImage boot disc before the Seagate could be used. But, lo and behold, there it was! I was immediately able to create a new folder for the backup files, set up the source and destination drives and begin the backup process. So, I'm currently working off the newly created hard drive with the files that were on the Seagate, free from worries about any future problems. In my particular case, the Seagate contained about 250GB of content. The backup files generated to the destination drive used (a Western Digital 500GB purchased and installed at the time the Seagate initially went down) numbered 419. Of course, depending on the content of your drive, that number will vary. Following everything, the only thing I had to do was to transfer a few folders I had created in My Documents, the Outlook .dat and Internet Explorer Favorites files over to the newly restored drive to bring it up to date. The Western Digital (containing the backup files from the Seagate) will now be stored away for any future drive restoration needs. The Seagate will be degaussed, rendering it unreadable and useless. I would highly recommend to those of you who haven't tried the cloning process yet to do so. It is the most effective method to ensure the complete recovery of your hard drive should anything happen. Following the cloning of the drive, the only thing left to do is to back up your data (with any of the typical back-up programs available) on a daily basis prior to shut down so that any loss will be kept to an absolute minimum. Bart PE/DriveImage XML cloning software does not allow for incremental back ups. However, other retail programs are out there that will. If you don't mind using a separate data back-up program, then you can't beat the price of Bart PE/DriveImage -
The Solution for Seagate 7200.11 HDDs
Twittwilly replied to Gradius2's topic in Hard Drive and Removable Media
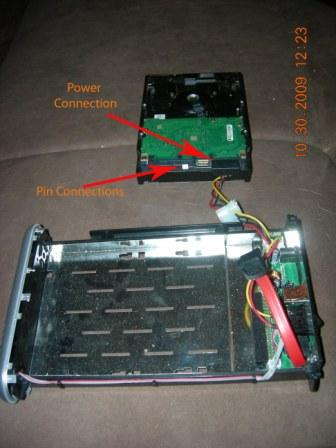
quote name='MRA' date='Oct 30 2009, 10:43 AM' post='890593'] jaclaz, I have the Coolmax power supply at http://www.coolmaxusa.com/productDetails.a...egory=converter and it DOES block the RX/TX connections with the corner of the square. I don't see how the one from Hong Kong on eBay could be any different. Twittwilly, I looked at the enclosure on Amazon and it looks just like the one I bought. I don't have time to take a picture and upload it to show what I am referring to right now, but I need to push the drive onto the SATA connections in the enclosure and when it is on all the way, there is no access to the RX/TX. I have an extra male to female SATA connection, but don't I also need to connect the SATA interface as well? If that's not needed, then I think I may have figured out my confusion. - MRA No. It really isn't the same thing that you purchased. It doesn't connect by sliding the mounting tray back into the enclosure. Once again, all the connections are on the sliding mounting tray itself. The power wire is quite long enough to easily permit turning the hard drive to permit unhindered access to the pins. In fact, it's long enough to lay the drive beside the tray. Here are a couple of pictures of the Acomdata: As you can see, the length of the power cable to the hard drive is long enough to provide very easy access to the pins. This is a top view of the tray. There is a metal cover placed over it. But it is very easily removed for placement of the drive or gaining access to the connection wires. Just gently press the sides of the metal cover and pull up. The On/Off Swtich and AC power connection are also on the tray
-
The Solution for Seagate 7200.11 HDDs
Twittwilly replied to Gradius2's topic in Hard Drive and Removable Media
Two point JFYI: you DO NOT want an enclosure you DO NOT want to add an extra layer of possible problems (the USB connection) However, if you are going to use the USB interface, get a "free" one, examples: http://cgi.ebay.com.sg/New-USB-to-SATA-Con...=item3a53b43d76 http://cgi.ebay.com.my/ws/eBayISAPI.dll?Vi...em=260477902803 jaclaz The USB cable is not used or connected. It is used simply to power the Seagate hard drive during the code sequence. -
The Solution for Seagate 7200.11 HDDs
Twittwilly replied to Gradius2's topic in Hard Drive and Removable Media
I don't quite understand. How do you make connection to the power cord if you can't attach it with the mounting tray out of the enclosure? Just push the tray back in with the drive mounted on it and slightly add pressure until you feel the drive connect? If this is correct, in that case you have to get a male to female SATA power cord....which they should have at the same store. Failing that, I would return the enclosure due to the fact you were misled by the individual who made the recommendation to you. I have the Acomdata Samba Sata/Pata enclosure which has all drive connection wiring (with the simple pull-off removal of the top metal covering on the tray) and the power switch/AC adapater plug/usb connection on the slide-out tray itself. It allows easy access to the pins and does not require re-insertion to the enclosure cover. Amazon has them on sale here: http://www.amazon.com/dp/B000VNJD1S/ref=as...ASIN=B000VNJD1S -
The Solution for Seagate 7200.11 HDDs
Twittwilly replied to Gradius2's topic in Hard Drive and Removable Media
Last time I checked WINRAR was COMMERCIAL. 7-zip, on the other hand is Open Source (donations accepted): http://www.7-zip.org/ jaclaz Thank you jaclaz. I meant to point that out, but forgot to do so. -
The Solution for Seagate 7200.11 HDDs
Twittwilly replied to Gradius2's topic in Hard Drive and Removable Media
And now for something kind of completely different: What to do with the contents of the Seagate once you get it back? Like most folks, I sort of religiously back up data files on my computer, using the typical back-up software, to an external hard drive (in my case, a few Western Digital "My Book" external hard drives). But, when something happens to your drive and must replace it, you've got the data backed up to replace on the new drive, but you are left with the daunting task of re-installing Windows, all of your programs and the settings you were using with them, and everything else that wasn't included with those common types of back-up software. Well, there is another option available to you that will completely copy EVERYTHING (and, yes, I DO MEAN EVERYTHING) on your hard drive, which provides an EXACT copy of the original drive. This copy can then be transferred to a newly installed blank hard drive, which provides you with a new completely bootable main hard drive; which, in turn, allows one to pick up exactly where one left off with the original...assuming, of course, that everything has been updated at the time the disc copy was made. It's called CLONING. In cases such as the Seagate firmware problem (but certainly not limited to this particular situation), this process is really the most suitable way to go to transfer your programs and data from the restored Seagate to a new drive. So, once you have achieved a successful restoration of your stupid Seagate, I would recommend that you seriously consider this option to avoid going through the whole painful process of trying to find all of your program installation discs, the Windows installation process and all of stuff you downloaded from the web. All of the programs you will need to accomplish this are ABSOLUTELY FREE. There is the back-up software program, a back-up software plug-in, a virtual Windows machine/hard drive program and an image burning software program. You might also want to download and install WINRAR to your computer, if you don't already have it installed. Winrar is a file compression program like ZIP. A kind soul by the name of DATAMIKE00 has put together a series of tutorials on YouTube that take you through the set-up process. Each of the two tutorials is divided into multiple parts (one is a three-parter, the other is two part) and are very comprehensive and informative. I suggest you watch the BART PE (3-part) series first here: Then watch the VMware VMserver 2.0 tutorial (2 parts) here: Now, I should point out that Datamike00 has quite a few drives on his machine that may cause some confusion with the viewer about where all of this stuff is being downloaded to. Just keep in mind where stuff on YOUR machine is being downloaded to so that you can follow along and retrieve the downloaded components as you need them to install. I should also clarify that some of the initial steps Datamike00 takes on the VMware tutorial to create a virtual machine right off the bat are necessary to do as shown, although he doesn't explain the reasons why right away. It seems that copying your Windows installation disc from your DVD player within the program does not work that well. Therefore, an .ISO image of the operating system must be constructed to ensure accuray of the transfer to the virtual machine. Once installed and activated, the virtual machine software takes you completely off your main hard drive and becomes a stand-alone "ghost" operating system. Though you can access everything on your main drive (copy from and write to), you just aren't actually working off of it. You may have to watch these two series more than once (and probably take some notes) before it all sinks in. However, it isn't as daunting as it may initially appear to you. With this method you can achieve successful results no matter what your drive configuration is. Whether you're working with a single drive, master-slave or RAID configurations you CAN do this. If you are working from a single drive in your computer, you will also need an external drive enclosure device. In my situation, I am working with a single hard drive. I shall be using three various drives to accomplish what I want to do: The original Seagate, a second drive to make a new bootable main drive and a third drive to be used as a stored-away backup. The original Seagate will be tossed once its files are no longer needed. PLEASE NOTE: Keep in mind that the new drive that the files will eventually wind up on MUST BE the same size as or larger than the Seagate from which you copied your files. There are other programs available to accomplish this kind of thing. PC Magazine has provided a review of some of the most popular here: http://www.pcmag.com/article2/0,2817,2308456,00.asp -
The Solution for Seagate 7200.11 HDDs
Twittwilly replied to Gradius2's topic in Hard Drive and Removable Media
Good God man! I am almost as overwhelmed as you are with the Maple Leaf Mountain instructions. Fortunately for me, my computer (which was custom built by a tech who works at the computer shop I deal with) was not provided with a serial port. Even if it had been, I don't think I would have opted for that particular method, since my soldering skills leave much to be desired. So, I was limited to the CA-42 cable option. Yes, you must have those pins unobstructed to work with them. That issue is solved by the external hard drive enclosure. But, perhaps longer wiring segments from the all-in-one board (aka breadboard) to the Seagate would have solved that problem too. As you see in the pictures that are provided on the site, there is plenty of room available between the drive and the breadboard to make connections to the pins on his Seagate on his setup. People providing information to this "sticky" thread have reported successful recovery using cardstock to cover EITHER the motor contacts or the head contacts on their Seagates. I would imagine that the choice depends on the particular Seagate model you are trying to recover. The vast majority of success stories (and which is most widely accepted currently) involve the head contact method. Either way, you don't need a hulking piece of paperstock to accomplish this task. The thicker the paper is, the more likely the chance becomes that you may warp the circuit board. If you are using a business card piece of paperstock, DON'T fold it in half. It is totally unnecessary. I think you would probably want to email Maple Leaf, using the link provided on their site, to present the issues you are facing so that you get the answers directly from the source. The site was last updated on 19 September, so one can only assume that the info provided for this method is correct as of that date. The contributor may have been facing issues which are not necessarily the same as you experience, so direct contact with him would be the best way to go in order to adapt this particular process to your specific needs. By the way, it would help if you provided some basics on the Seagate you are trying to recover...like is it a Barracuda 7200.11? What size is it (500GB, 1T, 750GB)? HELPFUL HINT: When providing a link on your posts, DON'T use the INSERT LINK button on the menu bar of the message window. Rather, go up to the address bar on the main Windows page, copy the address of the page you are on and wish to link to, then paste it within your message. It automatically converts to a workable link within your message. -
The Solution for Seagate 7200.11 HDDs
Twittwilly replied to Gradius2's topic in Hard Drive and Removable Media
Well, one of the problems you are fighting with your efforts is that you are not truly paying attention. If you look within the header of any page of this "sticky" section, on the left hand side, you will see a little white box displaying the total number of pages contained herein [Note: The total number of pages related to this thread is 105, not 130]. To the right of the number, you will see a drop down arrow, click on it, enter a number and you can navigate to any page you choose within the section. Keep in mind that the first page contains the oldest posts to the thread. Page 105 contains the most recent posts. Unfortunately, Graduis' first language is not English and some oversights and errors were involved in his post on page 01...which were corrected and cleared up on later pages. Read on my boy and learn!!!! I've read through this entire thread several times to glean the information I needed to obtain the success that I achieved with my Seagate during a three and a half week attempt at this effort. I'm no expert, but a little research and understanding of what you are reading goes a long way toward a successful conclusion to your Seagate repair. If you are not willing to read some of the extremely helpful information contained in this thread, I suggest you call Seagate, get a return authorization code and send it back to them for repair and data recovery (which will cost you between $500-$3000, depending upon the difficulty involved in the recovery process). The issues which you bring up have been repeatedly covered within this thread on later pages. Why you would assume that you could receive ANY accurate information from employees of either Radio Shack or Best Buy is beyond me. You are not dealing with computer experts at either location. They are oft-times completely unfamiliar with the products they sell, much less highly technical issues surrounding firmware programming errors. Not knowing whether you have a SATA or PATA drive, go to your local computer repair shop and buy a hard drive enclosure ($35-$40) that is compatible with your drive, which is powered with a supplied AC adapter (a USB cable is also supplied in the package, but you won't need to make a USB connection to the computer....you only want to power the drive itself). They also sell enclosures which will work with both SATA and PATA. Place the drive into the enclosure tray, plug in the connection from the AC adapter and connect the power cable to the Seagate drive...you dont' have to connect the data cable. Do not replace the cover on the enclosure or slide it back into the case (if that's how it's built). Leave it open and accessible for the wiring connections to the drive RX,TX and GND pins on the drive, as well the procedures involved with the firmware circuit board. The enclosure allows you to switch off the Seagate (when prompted to do so) with a toggle switch rather than pulling out and re-inserting the drive's power cable (which may possibly disrupt your connection to the RX, TX, GND pins on the back of the drive in the process). Go to the following link and read EVERYTHING on the page contained therein before you try anything. Make sure you UNDERSTAND it. PRINT IT so you can have it handy as you go along with the repair. FOLLOW THE INSTRUCTIONS TO THE LETTER. (NOTE: Since you've already put together your battery pack for the array you've set up, just skip the part covering the powering of the RS232.) http://sites.google.com/site/seagatefix/ -
The Solution for Seagate 7200.11 HDDs
Twittwilly replied to Gradius2's topic in Hard Drive and Removable Media
Well, I was finally able to bring back the 500GB Seagate drive that went down on the last Friday of September. The success of this effort, however, was mixed at best. I thought it may be helpful to provide a synopsis of what I experienced during the final days before success was finally achieved, just in case some of you run into the same issues I did. If you've been following my saga over the past few days, you know I was using a CA-42 with a battery pack to power it (Original OEM type, made in Thailand found at Amazon.com: http://www.amazon.com/Nokia-Original-CA-42...i/dp/B0018MAGIK. The wiring configuration for this particular cable was as follows: Red = Connect to positive terminal to battery pack. Black = Connect to negative terminal to battery pack AND to ground pin on the affected hard drive (I used a mini alligator clip wire to make the extension from the battery to the CD audio wire connected to the hard drive's ground pin). White = Connect to RX pin on the affected hard drive. Blue = Connect to the TX pin on the affected hard drive. To connect the red and black wires to the battery pack, I initially used duct tape to secure them to the terminals, but found that glue residue from the tape interfered with a reliable connection, even though I had sandwiched the connector pin in between two pieces of aluminum foil. So, because of the unreliability of the duct tape method, I switched to duct putty (found at Lowe's) with the same foil sandwich. I also used an adjustable clamp to gently tighten the battery pack and the connections to it up to ensure continuous power flow. It is extremely important to make sure that your connections to the hard drive are absolutely secure and tight. Like most people, I initially purchased those tiny brass connector pins from the link provided on this forum, as well as on the video tutorial provided by Nitrohelix on YouTube. However, in my experience I found them to be very unreliable due to the ease with which they separated upon connecting to the hard drive. I then switched to an audio cable taken from an old CD player. These were made with steel or some other harder metal and are not as sensitive to wire movement or even the slightest touch that would interfere with the brass pins' connection. The CD audio cable female connectors are slightly larger than the pins on the back of the affected hard drive, so a slight adjustment to them is necessary to ensure a good connection. If you have watched Nitrohelix's video, you will have noticed that she uses this rather large pair of pliers to crimp the wires to the brass pins. Nothing wrong with that. However, when making adjustments to the female connectors that go to the back of the hard drive pins you really need to use that type of plier with extreme care (unless you have a very good touch). To ensure that the CD audio cable wiring is securely fitted to the hard drive pins, I used a mini electrical pair of needle-nosed pliers and very lightly applied pressure until I wound up with a somewhat oblong appearance on the connectors. It took two attempts to fashion them to a state where they were absolutely tight on the hard drive pins. Apart from trying to figure out the correct overall wiring scheme on the various types of CA-42 cables available, the connection to the hard drive pins is the second most important factor related to why so many people are having problems communicating through Hyperterminal. The wiring to those hard drive pins must be tight. (HELPFUL HINT: If you perform the loop test on the RX and TX wires on the cable before you connect them to the hard drive and see the characters you type in Hyperterminal, so far so good. If, after making the CORRECT connections of those wires to the hard drive pins and you are not able to communicate through Hyperterminal, it will undoubtedly be because the connections to the hard drive pins are not tight enough.) Using the above directions, I was finally able to communicate wtihin Hyperterminal successfully. I might also point out too, if you are just starting out or are currently stuck on a step, you might want to do a little research on the CA-42 described in this forum. Alot of pictures have been provided for the various types available, along with the wiring schemes involved with them. If you find that you have one of the cables that has been previously described on the forum, you really don't need to remove the coverings on the USB connection side of the CA-42. The wiring is the same. One of the problems with removing the covering to the USB side of the cable is that, if you are not extremely careful while cutting, you may very well damage the circuit board underneath and render the cable totally useless. As far as I can determine, the only reason the covering is removed in the first place is to check to see if the abbreviations for GND, TX, RX are imprinted on the circuit board. In most of the variations of the cable available, those abbreviations are not found, so it then becomes pointless to risk damaging the cable's circuit board to look for something that isn't there. I think one is better served by going to the links provided by the various contributors to this forum and purchase the same variation they have used to successfully complete the project. It will help with alot of time wasted trying to figure out which wire is which. Once communication with Hyperterminal was achieved with all of the wiring connected, I successfully followed the command sequence and found my Seagate's hard drive desktop appear on the screen once again....just as I had left it on that last Friday in September. But it didn't happen without some issues In my particular case, once the "fix sequence" was completed and reboot started , it took quite a while for the hard drive to get through the loading process...all the way from the initial Windows welcome screen to loading the start up programs into the system tray. I didn't time it all completely, but it was over 20 minutes before the desktop finally appeared and allowed me to navigate throughout the contents of the drive. Following an abbreviated check of the BIOS, files, programs and settings, Windows components and related files, etc., I found that everything I checked was accessible and usable and just as they were before the hard drive went down. However, the speed with which one would normally expect to complete these simple tasks had been significantly degraded. I have a program called SystemCare on the Seagate that performs "in the background" checks on system problems, fragmentation issues and other things. Just for the heck of it, I brought up the program and ran it. It found no problems. I also checked the drive within device manager and it indicated the drive was operating properly. I do alot of music restoration and remastering, using WaveLab 5, which can be hoggish on the memory. So I started WaveLab and did a little test restoration sequence on a 3:50 music file. I was thoroughly able to complete every task involved in the process, save the resulting file to the disc itself and then copy it over to an external USB flash drive. Although the process took longer than it normally would, it was entirely successful and the flash drive file was perfect when I played it back on the hard drive that I am using now. So, after that initial check of the drive's contents, I then went ahead with the firmware upgrade (from the bootable disc that I made for it earlier this month) found the the Seagate website. Everything appeared to go along fine during the firmware upgrade process. It completed rather quickly and, at the prompt, I restarted the computer. At re-start-up, the loading process got as far as the initial Windows welcome screen with the progress bar, which ran for a little while and then suddenly went over to the familiar "we are sorry for the inconvenience" blurb found on the window that allows one to start in safe, safe with networking, last known working configuration, etc....where it seemed to stall. I retried load up with both safe and last known working configuration options. But they also seemed to stall. So I shut down the computer, switched out the drives and went over to Nitrohelix's YouTube page to present the problem I was facing. She suggested that it sounded like a faulty firmware flash problem and advised me to try the upgrade flash again. I then switched the hard drives out (back to the Seagate), redid the firmware upgrade and experienced the same problem. However, this time I just let it run on the "start windows normally" option. Very, very slowly it began to progress forward. It was a good 40 to 45 minutes before I was able to see the desktop and get back into the drive. Again, everything seemed to be fine with the contents on the disc. Again, I ran the SystemCare program and everything was fine. Also did another WaveLab restoration file. This time I kept getting those kind of hestiations when the cache limit isn't set high enough to provide for the program's memory needs. But, I plodded along and was able to write the resulting file to the disc and copy it over to the flash drive again. This file also was perfect when played back on the hard drive I'm using now. So, the only question I have now is whether I'm stuck with the result I have gotten with the Seagate drive, or is it possible to run the "fix sequence" again to see if I can get a better outcome on the speed issues with a repeat performance? I am planning to clone the Seagate drive to get the partition onto a new drive. That's about it...it works, but it ain't perfect. -
The Solution for Seagate 7200.11 HDDs
Twittwilly replied to Gradius2's topic in Hard Drive and Removable Media
OK...I've tried...still no communication with Hyperterminal. Here's what's happening: With the yellow wire connected to the ground to the Seagate HD, with just the power to the battery pack connected, I get an automatic flow of "junk" characters on the Hyperterminal display. I leave the yellow wire connected to the ground and remove the CA-42 from USB port. I then power up the HD, wait for the complete spin-down and reconnect the CA-42 to the USB port. I then go into Hyperterminal, enter all of the settings and attempt to enter ctrl-z....NOTHING When I go back into device manager, it tells me the modem is working properly and is enabled. While continuing to tinker with this CA-42 connection set-up, I reverted back to the black wire ground connection to the Seagate HD. I powered up the Seagate HD, waited for the spin-down, connected the CA-42, went into Hyperterminal, entered the settings and clicked OK. Immediately, there appeared a short blurb related to CA-42 cable info on the screen with the blinking cursor below it (the first time that's ever happened). But when I attempted to enter ctrl-Z, I was met with failure once again. I then set up a new connection, same COM ports, same settings, etc. But, on this second try the blurb didn't show up. Despite numerous tries on both black and yellow wires, I wasn't able to repeat it. At this point, the only thing I can come up with is that I must have either caused some type of short or connection damage on the cable's CB when I cut away the inner white plastic covering. So, I've ordered a new one (same type from the same company). Well, I got the new CA-42 today. Set everything up, powered up the hard drive, and connected the cable after spin-down. Lo and behold, I managed to successfully enter the ctrl-z command received the F3 T> response. Then, apparently one of the connections on the hard drive dropped out, and that was that . I powered the cable and hard drive down and attempted to tighten up everything, but couldn't re-establish connection...couldn't even bring up the ctrl-z on the subsequent attempts. I am using duct tape to connect power and ground to the battery pack (with an extension running from it to the hard drive). I've noticed tape glue residue on those stupid little female connectors and may be interfering with a good sustained contact with the batteries, so I guess I gotta figure out another method of maintaining a solid connection on those battery pack contacts. -
The Solution for Seagate 7200.11 HDDs
Twittwilly replied to Gradius2's topic in Hard Drive and Removable Media
OK...I've tried...still no communication with Hyperterminal. Here's what's happening: With the yellow wire connected to the ground to the Seagate HD, with just the power to the battery pack connected, I get an automatic flow of "junk" characters on the Hyperterminal display. I leave the yellow wire connected to the ground and remove the CA-42 from USB port. I then power up the HD, wait for the complete spin-down and reconnect the CA-42 to the USB port. I then go into Hyperterminal, enter all of the settings and attempt to enter ctrl-z....NOTHING When I go back into device manager, it tells me the modem is working properly and is enabled. While continuing to tinker with this CA-42 connection set-up, I reverted back to the black wire ground connection to the Seagate HD. I powered up the Seagate HD, waited for the spin-down, connected the CA-42, went into Hyperterminal, entered the settings and clicked OK. Immediately, there appeared a short blurb related to CA-42 cable info on the screen with the blinking cursor below it (the first time that's ever happened). But when I attempted to enter ctrl-Z, I was met with failure once again. I then set up a new connection, same COM ports, same settings, etc. But, on this second try the blurb didn't show up. Despite numerous tries on both black and yellow wires, I wasn't able to repeat it. At this point, the only thing I can come up with is that I must have either caused some type of short or connection damage on the cable's CB when I cut away the inner white plastic covering. So, I've ordered a new one (same type from the same company). -
The Solution for Seagate 7200.11 HDDs
Twittwilly replied to Gradius2's topic in Hard Drive and Removable Media
OK...I've tried...still no communication with Hyperterminal. Here's what's happening: With the yellow wire connected to the ground to the Seagate HD, with just the power to the battery pack connected, I get an automatic flow of "junk" characters on the Hyperterminal display. I leave the yellow wire connected to the ground and remove the CA-42 from USB port. I then power up the HD, wait for the complete spin-down and reconnect the CA-42 to the USB port. I then go into Hyperterminal, enter all of the settings and attempt to enter ctrl-z....NOTHING When I go back into device manager, it tells me the modem is working properly and is enabled. -
The Solution for Seagate 7200.11 HDDs
Twittwilly replied to Gradius2's topic in Hard Drive and Removable Media
-
The Solution for Seagate 7200.11 HDDs
Twittwilly replied to Gradius2's topic in Hard Drive and Removable Media
I´m a bit puzzled here, how did you do the loopback test, if you can´t connect in Hyperterminal? If you can config COM3, you should be able to configure Hyperterminal to access Com3, or am i missing something? What can you see in "device manager" in windows? You're puzzled? Well, I'm absolutely baffled!!!! The references to an inability to connect to Hyperterminal are solely related to my attempts thus far to install and use a modem supplied from the listing within the Phone/Modem control panel, which was part of the sequence performed by Nitrohelix in her YouTube tutorial. The above quote you cite is from a response she provided to me, suggesting that I shutdown/uncheck the COM 1 connection within PC Suite (which the program it installs takes over) so that the modem could then be directed to COM 3 (where my cable is installed) for the tie-in. Until her response, any modem I attempted to install was directed to COM 1 with no ability to change any settings to direct it to any other COM port. After following her suggestion, I was then able to re-direct the modem to COM 3, but unable to communicate with Hyperterminal. I've tried reversing the TX and RX wires, but nothing I enter is displayed. Prior to all of this, I connected just the cable to the USB port on the computer and looped the blue and white wires on my cable and was able to see the data as I entered it. After an unsuccessful result following a suggestion from KlingKlang on page 103, I have now reverted back to my previous configuration. What I am seeing now in device manager are the following: Under the Modem category: A Motorola USB modem connected to COM 3 (The Nokia modems installed (and listed within the Phone/Modem control panel) with PC Suite are all bluetooth types , which I cannot use on my computer.) Under the Ports (COM & LPT): COM 1 (empty) COM 3 (Nokia CA-42 cable)