harshadhparulekar
About harshadhparulekar

harshadhparulekar's Achievements
0
Reputation
-
My plan to preinstall XP on a drive.. will this work?
harshadhparulekar replied to betamax's topic in Windows XP
Alternatively, you can use WinSetupFromUSB to install XP via a bootable pendrive. Link - http://www.msfn.org/board/topic/120444-how-to-install-windows-from-usb-winsetupfromusb-with-gui/ Steps to Install Win XP via USB - http://myeeeguides.wordpress.com/2008/11/15/winsetupfromusb-install-windows-xp-from-usb-flash-drive/ -
Update Windows from LAN Server
harshadhparulekar replied to harshadhparulekar's topic in Unattended Windows 7/Server 2008R2
can you post steps about it -
Update Windows from LAN Server
harshadhparulekar replied to harshadhparulekar's topic in Unattended Windows 7/Server 2008R2
The MCM is running Windows XP Professional SP3. Forgot to mention in the topic post. Thus cannot find Server Manager under Administrative Tools according to justpooped's WSUS Setup. -
Hello everyone. Is there any way to force Windows Update to search for updates on a Master Client Machine(MCM) rather than the Microsoft server. I have a couple of machines connected in a LAN network. One of them is the Master Client Machine i.e. it is connected to the network and all software and other stuff which other connected machines may require is stored on this machine. If someone on the other machine wants a particular software, he/she browses this MCM's shared folders and take them. I don't plan on downloading & installing updates separately on each and every machine every time. Just download them once on the MCM and store them in a folder. These machines should connect to the MCM and search if there are any new updates stored in the updates folder. If so download and install them from that machine. If it is not possible to do it by changing Windows settings, at least I should be able to do it using some third party softwares and some automated scripts in batch or AutoIt. Please post detailed instruction/steps to perform the task. Need this for Windows XP and 7 clients. Will keep their updates in a separate folder. Also Office 2007 if possible. The MCM is running Windows XP. Thanks.
-
Create OEM Like recovery Solution for Laptop
harshadhparulekar replied to navid's topic in Unattended Windows 7/Server 2008R2
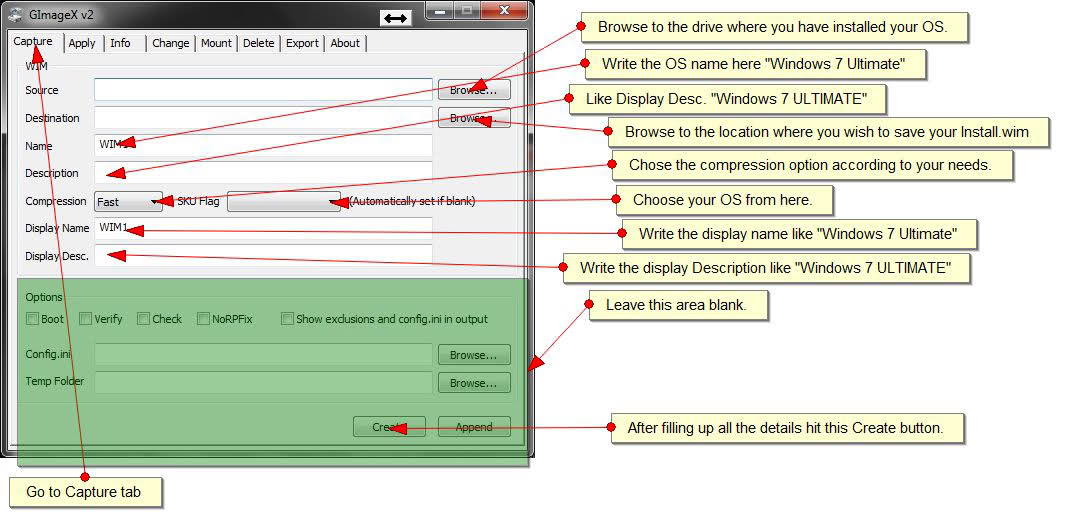
1. Pre-Requisites Install Windows 7(test OS) on a test partition on your hard drive. Install all your software, tweaks, and customizations on it. Create a WinPE bootable USB and put GImageX.exe file on it(root location). Remember if you have installed a 32bit test OS then you need WinPE 32bit else 64bit for 64bit test OS. 2. Sysprep Run the following - C:\Windows\System32\sysprep\sysprep.exe System Cleanup Action = Enter System Audit Mode Check Generalize option. Shutdown Options = Reboot 3. Remove the temporary user account’s profile 1. Click Start, type user profile in the Search box, and then click Configure advanced user profile properties in the search results. 2. In the User Profiles dialog box, click the name of the temporary user account you created when you installed Windows 7 on the reference computer, and then click Delete. Click Yes to confirm. 3. Click OK to close the User Profiles dialog box. 4. Remove the temporary user account 1. Click Start, right-click Computer, and then click Manage. 2. In the console tree (left pane), click Local Users and Groups. 3. In the details pane (middle pane), double-click Users. 4. Right-click the name of the temporary account you created when you installed Windows 7 on the reference computer, and then click Delete. 5. Click Yes to confirm that you want to delete the temporary user account. 6. Click OK to acknowledge that you are deleting an administrator account. 7. Close the Computer Management window. 8. Ok, Now copy all your desktop icons and paste those icon over here: C:\Users\Public\Desktop 5. Prepare the computer to start in Windows Welcome using Sysprep 1. Open Sysprep. (Windows 7 automatically runs Sysprep when you start the operating system in Audit mode.) 2. In the System Cleanup Action list, select Enter System Out-of-Box Experience (OOBE). 3. Select the Generalize check box. 4. In the Shutdown Options list, select Shutdown. 5. Click OK to run Sysprep and shut down the computer. 6. Capture an image of Windows 7 1. Insert the bootable UFD into a USB port on the reference computer. 2. Turn on the reference computer, and then perform the following tasks: a. When prompted, open the boot device list. (In most cases, pressing F12 during the basic input/output system [bIOS] splash screen opens the computer’s boot device list.) b. From the list of boot devices, select the bootable UFD that you inserted in step 1 to start the computer using the bootable UFD. Note If you do not see a prompt to display a boot device list, you must enable booting from UFD devices in the computer’s BIOS. For more information, see the computer’s documentation. 3. At the command prompt, type cd\, it will bring you to the root of your UFD, now type GImageX.exe, it will open the GImageX. 4. See attachment. Capture image on another drive on you HDD. 7. Recovery Partition 1. Download Easy BCD 2.0 from here: EasyBCD 2.0 Beta Builds - The NeoSmart Forums (you will need to register on the forum first) 2. open disk management, (type "partition" into the start menu its the first option that comes up) 3a Right click a partition with free space, and click "Shrink Volume" when it asks you to select how much space to shrink by allocate 4GB or 4096MB 3b Right Click the Unallocated Space and Click "New Simple Volume" 4. click ok through the next few screens, i recommend assigning it letter Z:\ so you dont get confused and accidentally delete it or save other files here 5. place your Windows 7 DVD in your drive and go to Computer, right click and then click Open NOTE: At this point please make sure you have "hide protected operating system files" DISABLED as it occasionally corrupts the copy, to do this press alt in any explorer window, then click tools>folder options>views>hide protected operating system files. 6. Copy the entire contents of the DVD to your Z:\ Partition 7. open Easy BCD and click "add/remove entries" click the tab labelled WinPE, When it asks for a path browse to "Z:\sources\boot.wim" and click ok, then click "add new entry" NOTE: At this point there is a good chance easybcd will tell you that the operation failed, just click ok and do it again, from what i can see this is simply its way of asking if your sure, and it will work 2nd time around. 8. thats it your done, when you reboot you will have 2 options, Windows 7, and NST WinPE Image, NST WinPE image is your recovery partition and will act as if you'd put the disk in.
-
Themes Preinstallation
harshadhparulekar replied to Drakelor's topic in Unattended Windows 7/Server 2008R2
try using Reverse Integration method to install themes and generate your custom install.wim file I followed this tutorial for reverse integration Building A Standard Image Of Win7 By Capturing Install.wim by nice_guy75 @rtwincustomize.net http://www.rtwincustomize.net/web/index.php?/topic/8343-building-a-standard-image-of-win7-by-capturing-installwim/ -
Try using AutoIT v3 Use its Au3Record.exe to record all your key strokes and mouse clicks to setup your "advanced sharing". Also use it to de-setup/remove the "advanced sharing". Then use Aut2Exe.exe which comes with the AutoIT setup to generate an executable file from the recorded ".au3" file. Use the generated exe files as you want. The task will be automated, you just have to run the exe file. Most AutoIT users record only keystrokes and not mouse clicks to perform their automated tasks. This is because if the screen resolution is different than the one on which the script was recorded then the mouse clicks will not work as the x & y co-ordinates will change and the click will happen somewhere else than the intended position. Another recommendation is to stop using the keyboard and mouse when the Automated task is happening through the generated file.
-
Possible to load the windows update files and let system auto run?
harshadhparulekar replied to rootz's topic in nLite
try this code, put all your updates in a folder and this batch script next to the folder @echo off cls title Windows 7 Offline Updater color 1F rem [Select Current Directory] set BATDIR1=%~dp0 cd /d %BATDIR1% :Intro Credits echo Windows 7 Offline Updater echo+ timeout /t 2 >Nul cls Rem Next Part echo -==//Created By: ColdZero\\==- timeout /t 1 >Nul echo Support available @ My Digital Life -Forums- timeout /t 3 >Nul cls :Menu cls Echo+ Echo ------------------------------------------------------------------------------- Echo Windows 7 Off-Line Updates Package: 2012 Echo ------------------------------------------------------------------------------- Echo+ echo Hello %USERNAME%, what do you want to do? echo+ echo A) Install Critical Updates echo B) View Installed Updates echo Q) Exit echo+ ::Choose Option set /p userinp= ^> Select Option : set userinp=%userinp:~0,1% if /i "%userinp%"=="Q" exit if /i "%userinp%"=="A" goto :Patches_Install if /i "%userinp%"=="B" goto :Patches_List goto :Menu :Patches_List If exist patchlist.txt del patchlist.txt wmic qfe get hotfixid >patchlist.txt start patchlist.txt goto :Menu exit :Patches_Install rem "Start /Wait File.exe /quiet /norestart" rem "KB00000.msu /quiet /norestart cls Echo+ Echo ------------------------------------------------------------------------------- Echo Windows 7 Off-Line Updates Package: 2012 Echo ------------------------------------------------------------------------------- Echo+ echo+ cd "Critical Updates" echo Installing 2012 Patches... echo+ @for %%V in (*.msu) do ( echo %%V %%V /quiet /norestart If %errorlevel% NEQ 0 echo Warning: Minor error! "dont worry" ) echo+ echo *********** echo Complete! echo *********** echo+ Pause cd.. Exit ColdZero's Page http://forums.mydigitallife.info/threads/20043-Windows-7-Offline-Updates you may need to edit the batch script as it is meant for Windows 7 updates -
CMD Update install problem
harshadhparulekar replied to BaTLeZone's topic in Unattended Windows 7/Server 2008R2
try this code, put all your updates in a folder and this batch script next to the folder @echo off cls title Windows 7 Offline Updater color 1F rem [Select Current Directory] set BATDIR1=%~dp0 cd /d %BATDIR1% :Intro Credits echo Windows 7 Offline Updater echo+ timeout /t 2 >Nul cls Rem Next Part echo -==//Created By: ColdZero\\==- timeout /t 1 >Nul echo Support available @ My Digital Life -Forums- timeout /t 3 >Nul cls :Menu cls Echo+ Echo ------------------------------------------------------------------------------- Echo Windows 7 Off-Line Updates Package: 2012 Echo ------------------------------------------------------------------------------- Echo+ echo Hello %USERNAME%, what do you want to do? echo+ echo A) Install Critical Updates echo B) View Installed Updates echo Q) Exit echo+ ::Choose Option set /p userinp= ^> Select Option : set userinp=%userinp:~0,1% if /i "%userinp%"=="Q" exit if /i "%userinp%"=="A" goto :Patches_Install if /i "%userinp%"=="B" goto :Patches_List goto :Menu :Patches_List If exist patchlist.txt del patchlist.txt wmic qfe get hotfixid >patchlist.txt start patchlist.txt goto :Menu exit :Patches_Install rem "Start /Wait File.exe /quiet /norestart" rem "KB00000.msu /quiet /norestart cls Echo+ Echo ------------------------------------------------------------------------------- Echo Windows 7 Off-Line Updates Package: 2012 Echo ------------------------------------------------------------------------------- Echo+ echo+ cd "Critical Updates" echo Installing 2012 Patches... echo+ @for %%V in (*.msu) do ( echo %%V %%V /quiet /norestart If %errorlevel% NEQ 0 echo Warning: Minor error! "dont worry" ) echo+ echo *********** echo Complete! echo *********** echo+ Pause cd.. Exit ColdZero's Page http://forums.mydigitallife.info/threads/20043-Windows-7-Offline-Updates -
use vLite and customize it also merge Windows Post Installer in it(see help at Www.wpiw.net) and use Au3Record.exe of AutoIT software to make unattended software installer of the software you plan on installing
-
Java silent install. Message pops up
harshadhparulekar replied to bench2010's topic in Application Installs
can you upload or give link for that installer as i tried it and it didnt work or atleast give link of how to do it using Total Commander -
Register Opera,IrfanView, unattended of course ?
harshadhparulekar replied to DarXyde's topic in Application Installs
took you advice and modified the batch code @echo off IF EXIST "%ProgramFiles(x86)%\IrfanView\i_view32.ini" GOTO x64 Goto x86 :x64 echo [Registration] >>"%ProgramFiles(x86)%\IrfanView\i_view32.ini" echo Name=Slicer >>"%ProgramFiles(x86)%\IrfanView\i_view32.ini" echo Code=312119004 >>"%ProgramFiles(x86)%\IrfanView\i_view32.ini" :x86 echo [Registration] >>"%ProgramFiles%\IrfanView\i_view32.ini" echo Name=Slicer >>"%ProgramFiles%\IrfanView\i_view32.ini" echo Code=312119004 >>"%ProgramFiles%\IrfanView\i_view32.ini" Error:- The system cannot find the path specified. The system cannot find the path specified. The system cannot find the path specified. however when i manually type each command (echo [Registration] >>"%ProgramFiles%\IrfanView\i_view32.ini" ...) separately in Command Prompt they work -
Register Opera,IrfanView, unattended of course ?
harshadhparulekar replied to DarXyde's topic in Application Installs
I am using a batch file to add (append actually) registration details to i_view32.ini and it is giving me the following error when i test run it through Command Prompt 'Files' is not recognized as an internal or external command, operable program or batch file. The system cannot find the path specified. Here is the code:- @echo off IF EXIST %ProgramFiles(X86)%\IrfanView\i_view32.ini GOTO x64 Goto x86 :x64 C: cd\ cd "Program Files (x86)" cd IrfanView echo [Registration] >> i_view32.ini echo Name=Slicer >> i_view32.ini echo Code=312119004 >> i_view32.ini :x86 C: cd\ cd "Program Files" cd IrfanView echo [Registration] >> i_view32.ini echo Name=Slicer >> i_view32.ini echo Code=312119004 >> i_view32.ini I tried the following too but didn't work echo [Registration] >> %ProgramFiles(x86)%\IrfanView\i_view32.ini echo Name=Slicer >> %ProgramFiles(x86)%\IrfanView\i_view32.ini echo Code=312119004 >> %ProgramFiles(x86)%\IrfanView\i_view32.ini Please help