Turge
About Turge

Turge's Achievements
0
Reputation
-
I looked at the thread and did not find a solution for receiving events via an HTA and updating a progress bar. Did I miss something?
-
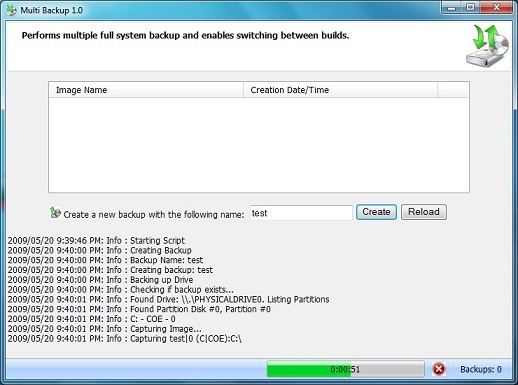
After spending quite a few hours trying to get an HTA to receive the progress event from GimageX and display a progress bar, I can finally say that I achieved everything I was targetting. Since I still have to clean up the code before posting it, I'll just post a screenshot of my app for now to see what kind of interest it generates. I should also point out that it currently works on Windows XP/Vista/7 and Windows PE 1.5/2.0/3.0 using all versions of GimageX. So let me know what you think..

-
You guys can also take a look at booting into Win PE from the HD as well, it's much quicker, and can all be done unattended. In the PE doc in the WAIK, look the article titled "Walkthrough: Boot Windows PE from Hard Disk". The way I did it from my Vista installation is I copied boot.wim to the c:\boot\ folder. I then added an option in the BCD to boot into PE (see "How to create an entry to boot a WIM image from a hard disk" from this page: http://technet2.microsoft.com/WindowsVista....mspx?mfr=true) One thing we do at work (using PE '05) is we have batch files/VBS scripts which change the boot loader (ntldr) and reboots into PE to capture snapshots or restore systems using ximage (now Imagex). Our PE image looks for c:\pe\auto.bat and executes it. This way, from Windows, we can copy the capture auto.bat or restore auto.bat to c:\pe\ and reboot into PE to perform our custom action. One important note aboute ximage is that it uses single instancing. This means that all duplicate files (eg. c:\windows\dllcache\*.dll) will only appear once. It is also non-destructive. You can capture an image of c: to c:\backup.wim. You can take a snapshot of a newly installed OS (eg. XP which basically consists of c:\Documents and Settings, c:\Program Files, c:\Windows) into a WIM file. the pagefile and system volume information folder will be ignored due to wimscript.ini. You can then reboot into PE, move c:\Documents and Settings, c:\Program Files and c:\Windows to c:\Backup and apply the image you captured to the c: drive. Any other folders in C: will remain untouched. Reboot and you're in a fresh install of XP and your data is still on the HD. Reboot into PE, delete c:\Documents and Settings, c:\Program Files and c:\Windows and move the 3 folders from c:\Backup\ back to the root or c: and reboot back into the original OS. All of this can be scripted of course. Hope this helps.
-
So, I should only have to ghost it? Will I need to remove it from the drive array (through the Silicon BIOS Raid Configuration Utility) and add the new one or will it the system simply think the new drive is the old one?
-
I'm hoping someone out there can help me. I have an Asus A8N-SLI Deluxe mobo with 2 Maxtor 6L300S0 (300GB SATA) setup in a striped array (RAID 0) on the SiI3114 controller. One drive is experiencing problems (takes a few secs to startup from cold boot, generates errors in MaxBlast). I have visited Maxtor's website and filled out the Advanced RMA, so a new HD is being shipped to me. Does anyone know how I could go about replacing the drive with the new one without having to backup 550GB of data?
-
1. From Windows XP with all the latest drivers loaded, download and install Driver Genius 2. Backup drivers to a folder. Each driver will be in its own individual folder with its Device Manager name. 3. Browse to root of drivers folder and search for all files. Select them all and copy them all to a different folder (C:\AllDrivers) 4. Install Vista and browse to c:\AllDrivers when it prompts for a driver Alternatively, you can use Driver Genius to create an EXE auto-installer. Pretty much worked with every driver I needed for my A8N-SLI Premium mobo.
-
Not quite sure how to get around it, but I don't have any "rights" problems when I log on as Administrator. Has anyone figured out how to grant an alternate account which is part of the Administrators group the same rights as the actual Administrator account? Maybe a local policy?
-
Sounds to me like you want to perform an unattended installation of Server 2003. RIS prepped images require the same HAL, and Sysprepped images need hardware which is similar. You could get away with it, but an unattended install would be the same as a manual install except you would provide all the answers through the answer file. It would take the same amount of time to install of course. Let me know if you need help with this. I have worked with all 3 methods.
-
here's something for the adventurer's out there. I wanted to figure out how to boot BOOT.WIM to RAM through RIS instead of the ISO for obvious speed/file size reasons. Using TFTP32, I was able to determine what files it was looking for and copy them from Vista Server. I can now boot PE in about 30 seconds. Here is are the files I copied from Vista Server: [RemoteInstall\Boot] boot.sdi [RemoteInstall\Boot\x86] abortpxe.com boot.ini bootmgr.exe hdlscom1.com hdlscom1.n12 hdlscom2.com hdlscom2.n12 pxeboot.com pxeboot.n12 wdsndp.com [RemoteInstall\Boot\Images] boot.wim boot.wim.boot.ini [RemoteInstall\tmp] ia64.2005.09.28.19.50.49.boot.ini x64.2005.09.28.19.50.49.boot.ini x86.2005.09.28.19.50.49.boot.ini x86x64.2005.09.28.19.50.49.boot.ini [RemoteInstall\Setup\English\Images\VistaPE\i386\templates] pe.sif Contents of pe.sif [SetupData] BootDevice = "ramdisk(0)" BootPath = "\WINDOWS\" OsLoadOptions = "/RDPATH=net(0)\Boot\x86\Images\boot.wim /RDSDIHDRPATH=net(0)\Boot\boot.sdi /DETECTHAL /MININT /USENEWLOADER" Architecture = "%MACHINETYPE%" [RemoteInstall] Repartition = no [OSChooser] Description = "Vista PE" Help = "Install Vista WinPE" LaunchFile = "\Boot\x86\pxeboot.com" Version = "5.2 (0)" One thing I had to do was mount the 2nd image of boot.wim (Server v5219) and rename source\setup.exe to setup.bak
-
Exactly the way we do it here. Diskpart.txt would look like this: select disk=0 clean create partition primary size=<main> assign letter=c create partition primary size=<data> select volume 0 select disk = 0 select partition 2 assign letter=d remove noerr select partition 1 active Sizepart.vbs Const ForReading = 1, ForWriting = 2, ForAppending = 3 Const TristateUseDefault = -2, TristateTrue = -1, TristateFalse = 0 Const OPEN_FILE_FOR_APPENDING = 8 Set fso = CreateObject("Scripting.fileSystemObject") Set objWMIService = GetObject("winmgmts:\\.\root\cimv2") Set colItems = objWMIService.ExecQuery("Select * from Win32_DiskDrive",,48) For Each objItem in colItems HD = int(objItem.Size/1000000000) DATA = 4 MAIN = HD - DATA DATA = ActualSize(DATA*1000) MAIN = ActualSize(MAIN*1000) Exit For next Set f = fso.GetFile("z:\diskpart.txt") Set ts = f.OpenAsTextStream(ForReading, Tristatefalse) t = ts.ReadAll ts.Close t = replace(t, "<main>", MAIN, 1, -1, 1) t = replace(t, "<data>", DATA, 1, -1, 1) Set objOutputFile = fso.OpenTextFile("z:\diskpart.txt", ForWriting) objOutputFile.Write t objOutputFile.Close Function ActualSize(Size) ActualSize=int(Size/1.024) End Function Function TheoreticalSize(Size) TheoreticalSize = int(Size*1.024) End Function STARTNET.CMD would then contain: copy x:\files\diskpart.txt z: > nul cscript x:\files\sizepart.vbs diskpart /s z:\diskpart.txt > nul format c: /FS:NTFS /V:MAIN /q /y > nul format d: /FS:NTFS /V:DATA /q /y > nul You'll have to forgive my code.. I modified it for your scenario. Our situation is a little more complicated since depending on the size of the HD, our 3rd partition can either be 2GB or 40% of the drive.