Search the Community
Showing results for tags 'Windows 8.1'.
-
is there a way to disable lock screen? because i want to use classic lock behaves like windows 7/vista
-
can you take a look at the image please? and i use the ribbon disabler any ideas? please reply thanks!
-
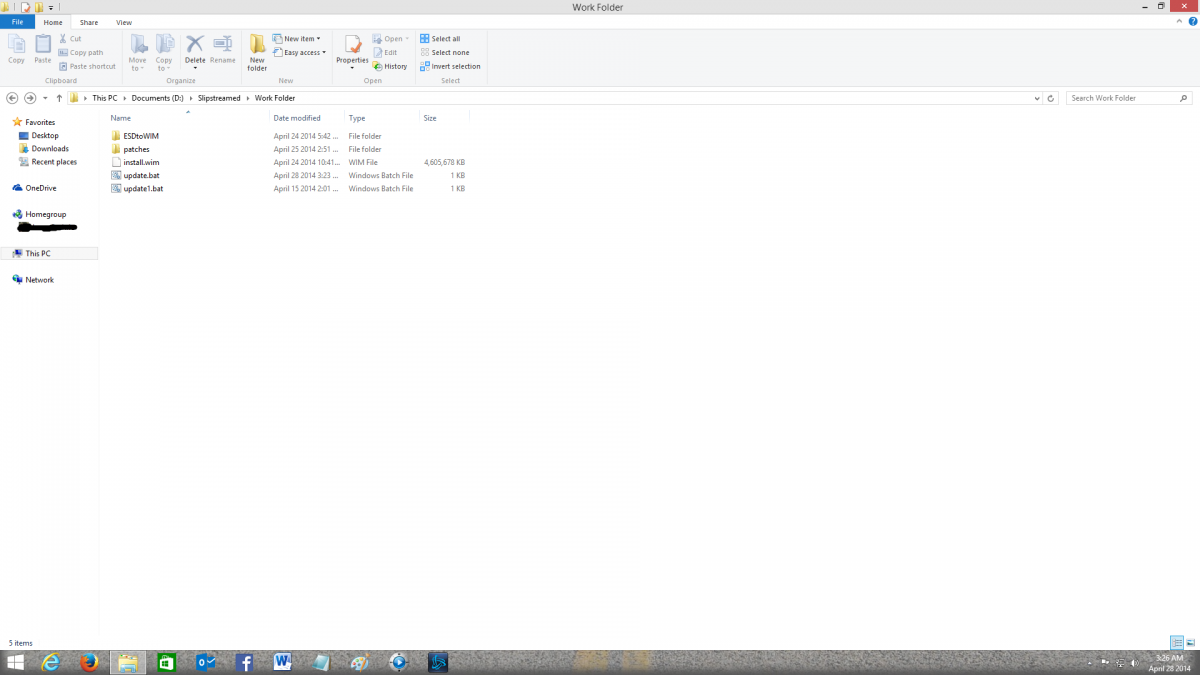
 Easy and detailed instructions. This is better than those Automated Apps like WinReducer and Win Toolkit which usually are buggy. Here you Right click the batch file and choose to run as Admin and then go have coffee. It's that easy. Attached photo is the folder structure to what we will create. This guide will slipstream all updates and clean up the image and convert the image to and from ESD<--->WIM Prepare and Slipstream Updates In to a Windows 8.1 .wim or .esd Image (Including Update 1) What you need: install.wim image file from the Windows installation media. If it is an install.esd image file then you can read the instructions on page 3 of this guide to convert it to an install.wim image file or create a Virtual Machine to do it (See page 4). Your install.wim or install.esd file is in the “Sources” folder which is found in the Windows Installation Media.2 batch files called update.bat and udate1.bat (Batch Commands are on this page)Windows updates downloader: http://www.windowsupdatesdownloader.com/ProgramFiles.aspxYour main computer that you will perform this task on should be Windows 8.1. You will need to Install Windows ADK for Windows 8.1 which is found here: http://technet.microsoft.com/en-us/library/dn247001.aspx. Attached picture is the folder structure. Batch File Commands to inject the 40+ updates for update.bat MD %~dp0WIN8 "c:\program files (x86)\windows kits\8.1\assessment and deployment kit\deployment tools\amd64\dism\Dism.exe" /Mount-Wim /WimFile:%~dp0install.wim /Index:1 /MountDir:%~dp0WIN8 "c:\program files (x86)\windows kits\8.1\assessment and deployment kit\deployment tools\amd64\dism\Dism.exe" /image:%~dp0WIN8 /Add-Package /PackagePath:"%~dp0patches" "c:\program files (x86)\windows kits\8.1\assessment and deployment kit\deployment tools\amd64\dism\Dism.exe" /image:%~dp0WIN8 /Get-Packages | more "c:\program files (x86)\windows kits\8.1\assessment and deployment kit\deployment tools\amd64\dism\Dism.exe" /Image:%~dp0WIN8 /Cleanup-Image /StartComponentCleanup /ResetBase pause "c:\program files (x86)\windows kits\8.1\assessment and deployment kit\deployment tools\amd64\dism\Dism.exe" /Unmount-Wim /MountDir:%~dp0WIN8 /commit Batch File Commands to inject Update 1 for update1.bat MD %~dp0WIN8 "c:\program files (x86)\windows kits\8.1\assessment and deployment kit\deployment tools\amd64\dism\Dism.exe" /Mount-Wim /WimFile:%~dp0install.wim /Index:1 /MountDir:%~dp0WIN8 "c:\program files (x86)\windows kits\8.1\assessment and deployment kit\deployment tools\amd64\dism\Dism.exe" /image:%~dp0WIN8 /Add-Package /PackagePath:"%~dp0patches" "c:\program files (x86)\windows kits\8.1\assessment and deployment kit\deployment tools\amd64\dism\Dism.exe" /image:%~dp0WIN8 /Get-Packages | more pause "c:\program files (x86)\windows kits\8.1\assessment and deployment kit\deployment tools\amd64\dism\Dism.exe" /Unmount-Wim /MountDir:%~dp0WIN8 /commit Instructions (Page 2) We need to Download the zip file named ‘Tools U Need” from my OneDrive and extract it, it will create the folder and files structure for you. Don’t modify the file or folder names with the exception of the main folder, which can be named to whatever you want. Skip to step 4 when completed. The Batch files will already be created. OneDrive address: https://onedrive.live.com/redir?resid=FF876747A444836D%2115004 To manually create the folder structure you need to make a folder and name it to whatever you like. Open that folder and create another folder and name it: patches If you need to convert install.esd to install.wim you will need to unzip the “Tools U Need” zip file and copy and paste the ESDtoWIM folder and its contents to the folder you created. It should also be outside the patches folder. Make 2 blank text files and name each file update.bat and update1.bat. Now copy and paste the text for each batch file command from page 1 into the corresponding file. Update.bat is for the 40+ updates and update1.bat is for update 1. Place these to batch files outside the patches folder. Copy your install.wim file to the folder that was created, which will be outside the patches folder, “NOT” in the patches folder. If the original file was a .esd file then see my instructions to convert the install.esd to install.wim.. Now all you need is the updates that you will download from the “Windows Update Downloader”. Download the update list from this page: http://www.windowsupdatesdownloader.com/UpdateLists.aspx (It’s a small file). Once finished downloading you need to Double Click it to add the list to the Windows Updates Downloader. Start the Windows Update Downloader, choose the operating system update list In the Windows updates Downloader, and then choose the Security Updates, Non-Security Updates and both versions of .Net Framework. Updates in the Optional folder won’t work. Start the download. All updates MUST be in the .msu format. Once the updates are downloaded, you need to copy and paste all the updates in to the “patches” folder. Make sure that you only copy the updates to the patches folder. In other words, there should be NO folders inside the patches folder. Only .msu (update) files can be in the patches folder. You can delete the ESDtoWIM folder if you are not going to use the command line tool to convert install.esd to install.wim. Now, the Structure of the folder you are working in should have only 5 items: An ”ESDtoWIM” folder, a “patches folder”, update.bat file, update1.bat file and an “install.wim” file. All .msu updates should be in the patches folder. Now Right click the update.bat file and choose to run as Administrator. Once it installs all the updates it will ask you to hit any key. Hit any key until is shows all the updates and continues. You will have to hit any key many times until it begins the last phase. Once it is finish, you can repeat step 7 through 9 but use the update1.bat file for the Windows 8.1 update 1 .msu files (There are 6 needed downloading). Once everything is finished then you can replace the old install.wim file in the Windows install media with the new one. Again, if the original was an install.esd file then it needs to be converted first to install.wim file.File Conversion Instructions (Page 3) Convert install.esd to install.wim From the “Tools U Need” folder which can be downloaded here: https://onedrive.live.com/redir?resid=FF876747A444836D%2115004, find and open the ESDtoWIM folder Right click the file named ESD2WIM.cmd and choose “Run As Administrator” Copy and paste (or type) the complete path location of the install.esd file. Example: C:\Work Folder\install.esd Press the enter key and wait for the process to finish. The location of the install.wim file will be in the “C” drive when the process finishes. C:\install.wim Continue with step 4 on the instructions page (Page 2).Convert install.wim to install.esd If the original file was an install.esd file then you will need to convert the install.wim file back to an install.esd file. Before we begin, make sure there is no file in C:\ called install.esd. In other words delete any file in this exact path C:\install.esd Copy the install.wim file to the C:\ directory. Example: C:\install.wim Click “Start” and do a search by typing: cmd Look for a file called cmd.exe in the search results. Right click cmd.exe and choose to “Run as Administrator” A black box will open. In the black box, Copy and paste the command in step 6 below and then hit the enter key. dism /Export-Image /SourceImageFile:"C:\install.wim" /SourceIndex:1 /DestinationImageFile:"C:\install.esd" /Compress:recovery It will take a very long time and a lot of processing during the conversion. So have patients. When it’s finished you will find the file called install.esd at this location C:\install.esd JJJCongratulationsJJJ You have completed the process of slipstreaming Windows updates and update 1 in to Windows 8.1 Install media. J Good luck J Installing Windows 8.1 to a VHD and using imageX to capture back the image as install.wim (Page 4) If you prefer not to use the command to convert the install.esd file to an install.wim file then you can create a virtual machine and install windows 8.1 in to it and then capture the VHD image back to an install.wim file. Here is how you do it. What you need: Windows 8.1 ISO, DVD or USB stick made bootable with Windows 8.1Microsoft Hyper-V (included as an add-on in Windows 8.1 Pro) or Virtual BoxFor Windows 8.0 serial key users: These generic keys will allow the correct version of Windows 8.1 to be installed. You will HAVE TO activate with your purchased Windows 8.0 key once all is installed. It will work 100%.334NH-RXG76-64THK-C7CKG-D3VPT for Non-Pro versionXHQ8N-C3MCJ-RQXB6-WCHYG-C9WKB for Pro versionKnowledge of these Virtual machinesImageX which comes with the Windows ADK for Windows 8.1Knowledge of the CMD command prompt.Knowledge of “SysPrep”Instructions Create a Virtual disk. The disk should be either VHD or VHDX Install Windows 8.1 in the virtual machine Press Ctrl + Shift + F3 when the Installation gets to the screen where you create a computer name. This will log you in automatically as the Administrator and start the SysPrep process. In the SysPrep preparation tool, make sure you choose “Enter system out of box experience”, and then check the box that says “Generalize”. The next drop-down menu: choose “Shutdown”. Click OK and the Virtual machine will shut down when finished. Now locate where the Virtual Disk that has Windows 8.1 installed on it. Mount that drive and give it a drive letter Make sure you installed ImageX which comes with the Windows ADK for Windows 8.1 Click the Start button and type cmd for command prompt. In the search results choose “Deployment and Imaging Tools Environment”. A command black box will open. Type the following: imagex /compress maximum /capture F:\ C:\install.wim "Windows 8.1 Pro" (F is the drive letter you gave the virtual drive when you mounted it, change it to whatever it is) Hit Enter and wait for it to finish. Look in the C drive where you copied the virtual drive and you will also see the install.wim file. This is the file you need to inject all those updates in to. You can now delete the Virtual drive and the ESD file.
-
 I had aero glass for win 8.1 installed on my computer, and when I updated my computer to windows 8.1 update 1, the login screen was broken with the message "Your DWM is not compatible with aero glass", making my windows installation unusable. i restarted several times, and windows update finally began undoing the changes made and i could login again. i tried uninstalling aero glass from control panel programs and features but when i run the uninstaller an error message pops up saying "the uninstall log file 'c:/aeroglass/unins000.dat' is in a format not recognized by this version of the uninstaller. cannot uninstall." any one experiencing the same problem? any solutions to fix the uninstaller?
 -
I would like to install the Windows XP Internet Games in Windows 8.1. I can do this on Windows 7 with the following registry edit. Windows Registry Editor Version 5.00 [HKEY_LOCAL_MACHINE\SOFTWARE\Classes\AppID\{73CFF131-CA3B-4654-9640-0F50B3ABA521}]@="zClientm" [HKEY_LOCAL_MACHINE\SOFTWARE\Classes\Interface\{55A8CF81-2C24-41F1-95BC-798E93CBB256}]@="IZoneProxy" [HKEY_LOCAL_MACHINE\SOFTWARE\Classes\Interface\{55A8CF81-2C24-41F1-95BC-798E93CBB256}\ProxyStubClsid]@="{00020424-0000-0000-C000-000000000046}" [HKEY_LOCAL_MACHINE\SOFTWARE\Classes\Interface\{55A8CF81-2C24-41F1-95BC-798E93CBB256}\ProxyStubClsid32]@="{00020424-0000-0000-C000-000000000046}" [HKEY_LOCAL_MACHINE\SOFTWARE\Classes\Interface\{55A8CF81-2C24-41F1-95BC-798E93CBB256}\TypeLib]@="{7A26EA67-A78A-4B89-A5E2-ED7EE09EC08A}""Version"="1.0" [HKEY_LOCAL_MACHINE\SOFTWARE\Classes\Zone.ClientM]@="Zone Class" [HKEY_LOCAL_MACHINE\SOFTWARE\Classes\Zone.ClientM\CLSID]@="{855B6281-563C-4462-8C6D-5326CA1D4FE4}" [HKEY_LOCAL_MACHINE\SOFTWARE\Classes\Zone.ClientM\CurVer]@="Zone.ClientM.1" [HKEY_CLASSES_ROOT\CLSID\{855B6281-563C-4462-8C6D-5326CA1D4FE4}]@="Zone Class""AppID"="{73CFF131-CA3B-4654-9640-0F50B3ABA521}" [HKEY_CLASSES_ROOT\CLSID\{855B6281-563C-4462-8C6D-5326CA1D4FE4}\LocalServer32]@="C:\\Program Files (x86)\\MSN Gaming Zone\\Windows\\zclientm.exe" [HKEY_CLASSES_ROOT\CLSID\{855B6281-563C-4462-8C6D-5326CA1D4FE4}\ProgID]@="Zone.ClientM.1" [HKEY_CLASSES_ROOT\CLSID\{855B6281-563C-4462-8C6D-5326CA1D4FE4}\TypeLib]@="{7A26EA67-A78A-4b89-A5E2-ED7EE09EC08A}" [HKEY_CLASSES_ROOT\CLSID\{855B6281-563C-4462-8C6D-5326CA1D4FE4}\VersionIndependentProgID]@="Zone.ClientM" [HKEY_CLASSES_ROOT\TypeLib\{7A26EA67-A78A-4B89-A5E2-ED7EE09EC08A}] [HKEY_CLASSES_ROOT\TypeLib\{7A26EA67-A78A-4B89-A5E2-ED7EE09EC08A}\1.0]@="zClientM 1.0 Type Library" [HKEY_CLASSES_ROOT\TypeLib\{7A26EA67-A78A-4B89-A5E2-ED7EE09EC08A}\1.0\0] [HKEY_CLASSES_ROOT\TypeLib\{7A26EA67-A78A-4B89-A5E2-ED7EE09EC08A}\1.0\0\win32]@="C:\\Program Files (x86)\\MSN Gaming Zone\\Windows\\zclientm.exe" [HKEY_CLASSES_ROOT\TypeLib\{7A26EA67-A78A-4B89-A5E2-ED7EE09EC08A}\1.0\FLAGS]@="1" [HKEY_CLASSES_ROOT\TypeLib\{7A26EA67-A78A-4B89-A5E2-ED7EE09EC08A}\1.0\HELPDIR]@="C:\\Program Files (x86)\\MSN Gaming Zone\\Windows\\" [HKEY_LOCAL_MACHINE\SOFTWARE\Classes\CLSID\{855B6281-563C-4462-8C6D-5326CA1D4FE4}]@="Zone Class""AppID"="{73CFF131-CA3B-4654-9640-0F50B3ABA521}" [HKEY_LOCAL_MACHINE\SOFTWARE\Classes\CLSID\{855B6281-563C-4462-8C6D-5326CA1D4FE4}\LocalServer32]@="C:\\Program Files (x86)\\MSN Gaming Zone\\Windows\\zclientm.exe" [HKEY_LOCAL_MACHINE\SOFTWARE\Classes\CLSID\{855B6281-563C-4462-8C6D-5326CA1D4FE4}\ProgID]@="Zone.ClientM.1" [HKEY_LOCAL_MACHINE\SOFTWARE\Classes\CLSID\{855B6281-563C-4462-8C6D-5326CA1D4FE4}\TypeLib]@="{7A26EA67-A78A-4b89-A5E2-ED7EE09EC08A}" [HKEY_LOCAL_MACHINE\SOFTWARE\Classes\CLSID\{855B6281-563C-4462-8C6D-5326CA1D4FE4}\VersionIndependentProgID]@="Zone.ClientM" [HKEY_LOCAL_MACHINE\SOFTWARE\Classes\TypeLib\{7A26EA67-A78A-4B89-A5E2-ED7EE09EC08A}] [HKEY_LOCAL_MACHINE\SOFTWARE\Classes\TypeLib\{7A26EA67-A78A-4B89-A5E2-ED7EE09EC08A}\1.0]@="zClientM 1.0 Type Library" [HKEY_LOCAL_MACHINE\SOFTWARE\Classes\TypeLib\{7A26EA67-A78A-4B89-A5E2-ED7EE09EC08A}\1.0\0] [HKEY_LOCAL_MACHINE\SOFTWARE\Classes\TypeLib\{7A26EA67-A78A-4B89-A5E2-ED7EE09EC08A}\1.0\0\win32]@="C:\\Program Files (x86)\\MSN Gaming Zone\\Windows\\zclientm.exe" [HKEY_LOCAL_MACHINE\SOFTWARE\Classes\TypeLib\{7A26EA67-A78A-4B89-A5E2-ED7EE09EC08A}\1.0\FLAGS]@="1" [HKEY_LOCAL_MACHINE\SOFTWARE\Classes\TypeLib\{7A26EA67-A78A-4B89-A5E2-ED7EE09EC08A}\1.0\HELPDIR]@="C:\\Program Files (x86)\\MSN Gaming Zone\\Windows\\" But it will not work on Windows 8.1. Does anyone have any suggestions?
-
i transformed windows 8.1 into mac os x mavericks, and then i uninstalled mac os x mavericks transformation pack, and i still see the mac icons, how do i delete the icons cache manually?
-
Good Morning all, I'm having an issue with a Win 8.1 box that constantly crashes every few seconds when accessing the desktop, or anything else that needs the desktop to run. The error in the Application log is: Faulting application name: explorer.exe, version: 6.3.9600.16441, time stamp: 0x5265dec8 Faulting module name: KERNELBASE.dll, version: 6.3.9600.16496, time stamp: 0x52b3f283 Exception code: 0xc06d007e Fault offset: 0x0000000000005a88 Faulting process id: 0x5bc Faulting application start time: 0x01cf47721bd5b117 Faulting application path: C:\WINDOWS\explorer.exe Faulting module path: C:\WINDOWS\system32\KERNELBASE.dll Report Id: 5c05ffbc-b365-11e3-beaf-7054d27f87a0 Faulting package full name: Faulting package-relative application ID: So far the troubleshooting I have done so far is: Restored to an earlier date that did not have the issue. Created a new Windows Profile. Updated the system drivers. So far, no change. Researching the issue online points to analyzing the crash dump. I have uploaded one to the following location: https://onedrive.live.com/redir?resid=807BB7EC55C6E53E!107&authkey=!ACgpngBQ98E7TG8&ithint=file%2c.rar I would be very appreciative if someone is able to do so, I'd rather not keep shooting in the dark if I can help it. Thanks! -Kyle
-
 'Sup! I'm starting a new topic because I believe there will be many people like me who have downloaded the Windows 8.1 Update 1, and happened to have its login screen broken with the annoying message of "Your DWM is not compatible with aero glass", making your Windows installation unusable. Also, I don't know the "proper" way of uninstalling Aero Glass. Before installing Windows 8.1 Update 1 I really don't know if there are any registry tricks involved. I did install the Aero Glass using the installer. As I didn't find anything on "Programs and Features", I decided to erase the Aero Glass folder. This didn't work. Fortunately, I was able too boot normally again by renaming "DWMGlass.dll" to "DWMGlass.dll.bak" in the C:\Windows directory. I believe this file can be deleted (I didn't do it because I didn't know what would happen if I did). I don't know if this "Uninstalls" the program, but I now have my Update 1 installation up and running. If you have a broken Windows 8.1 Update 1 installation because you didn't remove Aero Glass Launch Safe Mode. This is kind of tricky because Windows loads normally to the login screen. The problem is that you're stuck with the buzzing message of "Your DWM is not compatible with aero glass" and you can't do a thing. So either try pressing F8 repeatedly when you see the BIOS, or the logo of your computer, so you can access recovery mode OR try forcing shut down when the Loading circles appear at the boot screen. Select "Safe Mode". Your computer will boot normally. Then, go to "This PC", Click Local Disk C (Or whatever your Windows installation is) and go to the "Windows" folder, in there search for "DWMGlass.dll", either rename it or delete it. Then boot again. See, if anyone is actually reading this post before upgrading to Update 1, hope this helps
 -
I tried to go to creativx.net many times but the website is not available! Any ideas?
-
How do I get rid of the rectangle background on title bar instead of installing Big Muscle Aero Glass?
-
is it possible if you can make rounded theme in Windows 8.1, Big Muscle?
-
I'm having weird problems with folder icons. Desktop.ini contains the following: [.ShellClassInfo]IconResource=c41af100-6b25-4a2d-91ac-815a04daf3ea.ico,0The corresponding icon is present in the folder - but the folder icon stays default. The funny thing is, setting the icon with a program (folderhighlight) works, copying the folder anywhere keeps the icon as expected. However, copying the working set of desktop.ini+.ico to another folder doesn't make it display the icon.What am I missing? I tried clearing iconcache.db in my appdata and rebooting, but no change. edit: I really hate it when I find the answer right after asking for help... As stated here, you have to set attrib +s foldername for any folder you want the desktop.ini to work with. edit2: Actually, attrib +r foldername is enough. Interesting requirement.
-
I keep discovering broken processes in the Windows 8.1 task scheduler. Besides these two the latest one I found is in the "Windows Backup" task folder, using the command %systemroot%\System32\sdclt.exeTo find out if you have this issue, launch Windows Task Manager and see if you have several instances of sdclt.exe that cannot be terminated. This is apparently a known issue with Windows 8.1 that some users have attributed to the Intel Proset network drivers. But my PC had the issue even though my motherboard does not have the Intel Proset NIC. To fix sdclt.exe from sapping my memory, I disabled it: Open Windows Task Scheduler, drill down to the Windows Backup task folder, right click on ConfigNotification in the Task Window, and select "disable". I also disabled the associated Windows Service: "Block Level Backup Engine Service" at: HKEY_LOCAL_MACHINE\SYSTEM\CurrentControlSet\Services\wbengine and set the "start" parameter to "4" to shut it off. Taking these steps will interfere with Windows backup. So I would not recommend it for those who rely on Windows restore functions or whose PC's aren't afflicted by multiple instances of sdclt.exe. But for those of you using a third party backup solution (as I do) and who have the sdclt.exe problem, I can report that my system has more free memory and is a lot more stable after disabling the process.
-
I need help with this BSOD minidump from my windows 8.1 desktop. When teh system crashed, I think there was a message on the screen about a USB failure, but I don't remember the specifics. Can anyone advise me how to fix this issue? If it is caused by USB, is the crash due to a USB device or a USB controller/driver/software? The minidump information is below and my system is as follows: Homemade Desktop Windows 8.1 ASUS X79-deluxe MB Intel core i7 4790K 16GB ram (Team Extreem Quad channel DDR3 2400mhz) Nvidia GTX 770 Thanks
-
Well, why repost this when it's available on news sites? Because I want the community here to know. This will be included in the upcoming Patch Tuesday, so you can install it then if you wish. But Microsoft has made the patch available. This is only for Windows 8.1. It should solve the mouse lag issue in Source Games and Call of Duty, and possibly even more games. Cannot hurt to install it, but to be safe, as always have a backup, at least a system restore point. Have fun, guys! Official Download Links and Details from Microsoft: 64 bit patch download: http://www.microsoft.com/en-us/download/details.aspx?id=40909 32 bit patch download: http://www.microsoft.com/en-us/download/details.aspx?id=40910 Official details via Knowledge Base Article: http://support.microsoft.com/kb/2908279 More details can be found here via Neowin.