Search the Community
Showing results for tags 'unattended'.
Found 16 results
-
 POWIS Powerful Windows Setup This tool was developed to bring new user experience into Windows setup, supporting all Windows versions from Vista and newer. What features are added by POWIS? 1. Windows Recovery Environment boot menu option 2. Multi-Unattended selector 3. Dynamic drivers folder 4. DriverPacks solution using Snappy Driver Installer 5. RunOnceEx setup phase a. Certificates installing from any *.CER files b. Microsoft Office installing – 2007 or 2010 – 2016 or 2019 / 365 using YAOCTRI c. MSI Packages installing d. Products activation using Multi-OEM/Retail Project {MRP} - Mk3 or your own custom Activate.cmd e. Updates installing f. Applications installing g. Apply personal settings from any *.REG files h. DriverStore cleanup i. Scripts execution from any *.PS1 or *.BAT or *.CMD files 6. ESD support for Windows Vista and Windows 7 What is supported? 1) Any architecture, build and language ISO or extracted setup of Windows Vista SP2*, Windows 7, Windows 8.0, Windows 8.1 and Windows 10. Servers are untested but they should work too. This could be pointed to bootable USB too. 2) Only clean installations are supported 3) Fully Unattended *NOTE: For dynamic drivers folder and automated skipping product key in Windows Vista is needed Windows 8.0 setup engine, if you want these features enable ESDSUPPORT option in config.ini How to use POWIS? 1) Download and extract this tool, for example to C:\POWIS directory 2) Prepare plugins folder. This folder needs your attention a) driverpacks – place any compressed *.7z DriverPacks here. Snappy Driver Installer install compatible drivers before first reboot of deployed system. All available languages in SDI v1.21.2.2102 are mapped to Windows language codes. So perfect multilanguage support is available. If someone translate SDI, these new translations are needed to be hardcoded in Launch.cmd. You can find log files in %WINDIR%\Logs. Download DriverPacks here or here or here. b) drivers – if you want to apply drivers to deployed system before first boot. Place drivers in INF format into certain folders. All directory is for architecture independent drivers, x64 for 64bit drivers and x86 is for 32bit drivers c) oem – This folder is for Multi-OEM/Retail Project {MRP} - Mk3 which is compatible with POWIS solution from v137.1, Download and extract this project. Needed files are DeCompile.exe, OEM's.7z and OOBE.cmd, then rename OOBE.cmd to OEM.cmd. You can find log files in %WINDIR%\Logs. On Windows 8 and newer you can see black screen during setup for a while. Don’t worry MRP is installed on background. This is caused by Windows setup design, on Windows 7 is this process different and you can see screen with “Setup will continue after restarting your computer“ instead. d) office – All Office versions are supported. For Office 2007 place unattended setup into All subfolder. This Office version is only 32bit and it will be installed on both x86 and x64 systems. For Office 2010 – 2016 create x86 and x64 subfolders and place unattended setup into them. If you want to force 32bit Office on x64 systems place setup into All folder instead. For Office 2019 / 365 is supported YAOCTRI installation method. Just place generated setup directly into office folder. See pictures below e) setup – This folder is here for your own *.CER, *.PS1, *.BAT, *.CMD, *.REG , EXE and MSI files During setup process is setup folder dynamically scanned, so you can add / remove files perfectly on the fly directly on your USB setup media. You need to follow some rules when adding installers. If your applications have EXE installer for both architecture it must have –all in filename. If there exist standalone installers keep –x86 and –x64 in filename instead. To define silent switch create simple TXT file with same name as application installer, but without architecture identificator. So for WinRAR-x86.exe and WinRAR-x64.exe is needed WinRAR.txt with /S inside as only single line. MSI packages are installed automatically with /quiet /norestart switch. If you want to use your own switches do it in same way as you do for EXE installers. *.CER, *.PS1, *.BAT, *.CMD, *.REG are silently launched and applied. In scripts don't forget to exit them. f) unattended – place any Unattended files here, if you do it, you will be prompted for selection when setup begin g) updates – place any updates files *.MSU, *.CAB, *.MSP here and they will be silently installed. Just keep -x86 and -x64 in filename, simply follow the same logic as applications installers 3) Configure options in Config.ini 4) Launch POWIS.cmd as Administrator, then drag and drop extracted Windows setup path or ISO or already created bootable USB into console window. You can also use POWIS directly from CMD in your own scripts. See POWIS.cmd /? for more informations. When you point already created bootable USB, it must be without \ (backslash), like E: or G: not E:\ or G:\ otherwise POWIS end in fail with many errors. I tried to solve this, but on some languages is backslash different character. So this must be carefully driven by user. What is RunOnceEx? RunOnceEx is old build-in Windows feature introduced firstly in Windows 95, which processing commands one by one. In POWIS solution are these steps generated by RunOnceEx.cmd on the fly during setup process. This is also solution for some special cases. 1) Some applications needs created User account and can’t be installed through SetupComplete.cmd. RunOnceEx is processed under Administrator account so this limitation is gone. 2) SetupComplete.cmd and OOBE.cmd are ignored during setup when OEM key is used. This limitation is also gone in POWIS solution with RunOnceEx setup phase. NOTE: You can still use these files if you want, but they have their limitations explained above. To be able to run this solution was developed Watcher.cmd. Small script that runs on background when RunOnceEx is launched to watch every 1 second for explorer.exe and sysprep.exe in Task manager, as these processes needs to be killed immediately after they appears to avoid unneeded user touch and bring better and clean user experience. All steps are readed dynamically, so you can view all 10 steps or only few of them. This dialog is translatable through RunOnceEx.inf. It’s a small INF file with multilanguage strings, this is same method like drivers are localized. Currently are supported these languages. Many thanks for them to translators! English (en-US) Czech (cs-CZ) Brazilian Portuguese (pt-BR) Spanish (es-ES) Slovak (sk-SK) German (de-DE) Dutch (nl-NL) Norwegian Bokmål (nb-NO) Finnish (fi-FI) Bulgarian (bg-BG) Korean (ko-KR) French (fr-FR) Italian (it-IT) Portuguese (pt-PT) Russian (ru-RU) Danish (da-DK) Slovenian (sl-SI) Croatian (hr-HR) Greek (el-GR) Turkish (tr-TR) Romanian (ro-RO) Swedish (sv-SE) If you want to add your language translation, please translate these strings and submit them with language name / language code. They will be added in next release. FINTEXT = "Windows Post-Setup" CERTEXT = "Installing certificates" SCRIPTTEXT = "Executing scripts" OFFTEXT = "Installing Microsoft Office" MSITEXT = "Installing MSI packages" ACTTEXT = "Activating products" UPDTEXT = "Installing updates" SILTEXT = "Installing applications" TWKTEXT = "Applying personal settings" DRVCLNTEXT = "Removing unused drivers" RBTTEXT = "Reboot" Examples of translated RunOnceEx into Korean, Czech or Italian. This can support any language If you like old Window 95 setup style icon, disable ICONPATCH option in config.ini. I personally want new one instead. This is how original ugly old icon looks. NOTE: When you are removing components with NTLite or any other slimming down tool. Keep protected these Internet Explorer files as they are responsible for RunOnceEx - iernonce.dll + iernonce.dll.mui + IEAdvpack.dll. NOTE: If you remove them before POWIS touch keep calm, POWIS will add all needed files. Yes, it works with Server Core without problem too! What is Clean DriverStore feature? Have you integrated bunch of drivers into your image? CleanDriverStore.cmd is what every installed system with preintegrated drivers needs. All drivers that are not in use are automatically removed from DriverStore. NOTE: Keep all devices connected during setup or your integrated drivers for these devices will be removed! You can save a lot of space at installed machine. If you already updated your system drivers you can run CleanDriverStore.cmd as Administrator manually too! You can find log file in %WINDIR%\Logs. How is provided ESD support for Windows Vista and Windows 7? Yes, it’s possible to bring ESD compression into these older operating systems. This is provided by upgrading setup engine inside WinPE, this mean boot.wim is still original from Windows Vista or Windows 7. POWIS include RES patches, so setup looks same as original! To compress install.wim into install.esd you need to enable ESDSUPPORT + INSTALLRECOMPRESS options and set INSTALLFORMAT to ESD. What you need to do is simple, just provide new setup engine 1) Windows Vista require exactly Windows 8.0. For example English Windows Vista Ultimate SP2 x64 ISO have 3,7GB, compressed to ESD with WinRE option is final ISO 2,6GB a) This bring dynamic drivers folder support and automated skipping product key too b) Small glitch exist in setup after first reboot – setup activate second step „Expanding files“, but don’t worry it’s only glitch and setup is succesfully finished 2) Windows 7 require any Windows from Windows 8.0 and newer, works with Windows 10 20H2 without problem. For example English Windows 7 Ultimate SP1 x64 ISO have 3,2GB, compressed to ESD with WinRE option is final ISO 2,4GB How looks setup with applied POWIS? Whole Windows setup process is now more script driven. Due this method we are loosing Windows Recovery Environment option in setup known as Repair PC option. But this doesn’t matter as we added new boot option to winre.wim directly from sources folder to be able to enter Windows Recovery Environment. For example, this is how is changed setup structure in Windows 10 20H2v2. New folders and files that are reposponsible for whole magic are added Screenshots are in next posts! Release history 15.07.2021 - v1.0.3 - Added RunOnceEx Swedish (sv-SE) translation - Added Activation plugin folder and moved Activate.cmd inside - Improved setup.cmd for more customizable builds 01.07.2021 - v1.0.2 - Added RunOnceEx Greek (el-GR), Turkish (tr-TR) and Romanian (ro-RO) translations - Added install.esd input support - Now you can use POWIS on setup with install.esd - Added Themes and Wallpapers plugin folders - Added many new customizable options into config.ini - Fixed AutoUnattended selector - Fixed Num Lock default settings in WinPE - Fixed WinRE.wim name and description - Fixed RunOnceEx on NTLited images without Internet Explorer 27.05.2021 - v1.0.1 - Added RunOnceEx Slovenian (sl-SI) and Croatian (hr-HR) translations - Added DISM 10.0.19041.1 - now can POWIS run under Windows 7 host without problem - Fixed forgoten visible logs during upgrading setup engine 24.05.2021 - v1.0 - First public release Download https://www.mediafire.com/file/ekko89b1fqtnf93/POWIS_v1.0.3.7z/file or https://mega.nz/file/zAlDBYBK#DfYEu__hikhVasiDQvyzGhjUtMVLxi3rWw746oF70u8
 -
Hi everyone! I'm wondering if it's any Windows 10 Unattended Guide around here. I would be more than happy to participate in building it if it's not! Thank you!
-
 I am having yet another problem with Windows XP setup POST nLite , "Driver Packs" slipstreaming ... it seems that during XP's "GUI Mode" setup does NOT use the custom XP setup billboard (winntbbu.dll/winntbba.dll) ,but defaults to the "classic" xp gui setup mode... : // I would like to know what i need to edit in winnt.sif (nlite.inf??) or other XP setup file/s to enable XPs custom setup billboard to run during GUI setup mode??!!?? Thanks in advance for a reply!!
 -
Hello Forum members, I had the chance to get a copy of Windows XP 64 bit edition (that had previously been slipstreamed with SP 2 via nLite),but have run into setup problems copying over a dll file;XP setup says that "HAL.DLL is missing or corrupt" (funny thing is that it looks like it copied over to the virtual hard drive during text mode phase of setup??)...& will not continue setup... Let me preface this by saying i re-nlited the XP 64 bit iso to remove unnecessary non-system related files,folders as well as add some tweaks from nlite plugins so i do not think that would cause setup to fail,but I have never had any problems with using nLite on the 32 bit version of Windows XP so am at a loss as to what to do?? Any helpful suggestions,advice would be greatly appreciated since its mostly a hobby of mine to tinker with MS Windows XP...

-
Deleted
-
 I want to make an unattended Windows XP ISO, and I want to disable 'Show In Groups' in My Computer, and set it to classic view. I looked through nLite to see Explorer/My Computer options, but there was no checkbox for disabling 'Show in Groups'. My question is: Is there a registry script that disables 'Show In Groups' in My Computer?
 -
 All, First post here - looking for some direction. I have used the search function but I am looking for a clear, definitive answer. There are so many options available now for unattended and slipstream installs. I had a couple of questions: 1. Can somebody please explain the difference between them all - perhaps give them a ranking? 2. I need a solution that will allow me to: a. Remove unwanted components to shrink the size of Win7 install (small drives in use) b. Include the drivers for latest device (memory, graphics, wifi) and auto install them c. Include software packages - Office, VLC, Adobe, Chrome - and install using "silent" switches I will then place the finished installation onto a USB stick. My intent is to make the above modifications to a Win7 64 Ultimate installation. This will allow me to install everything from a USB, complete with drivers and the software I regularly use (with a silent install). nLIte did not work when I tried this previously. Any help and advice appreciated - you are the most current and up to date developers/users.
 -
Hello, I'd like to create an unattended Win7 installation with the latest KB patches and some custom settings&tweaks (expecially the Usb3.0 patcher). I'm quite confused, however, about the current available programs. - 7Customizer and RT Se7en Lite seem dead. - the new nLite (still beta) will costs 45$ even for home users!? - maybe there's a Win Toolkit 2 program (download?) with a limited (how?) free version. - other alternatives? - Windows Updates Downloader has stopped updating its lists in 2015\03. - I could start from it anyway, but I don't know if it's good for Win7 Pro and if it excludes any bad update (eg: Win10, telemetry) - other alternatives? Can you help me, please?
-
 Since there is no Win10 unattended subforum I am placing this here: How to set the default program by a command (CMD) or Powershell or registery modification? I have searched a lot and only found a way to associate files to specific programs, but that will only add them to the context menu list (Open With...>): @echo onassoc .mkv=MPC-BE.AssocFile.MKVftype MPC-BE.AssocFile.MKV=c:\Program Files\MPC-BE x64\mpc-be64.exe "%1"pauseThe command assoc creates the file type in the registry, the command ftype associates the program. In this example, "MPC-BE" is just a name that I use, you can also use "MPCHC or MPC or whatever, just as long as it matches the same you use in ftype command. But HOW can we set default program? I am particularly intested in: PDF, video files, image editor (Paint.net), 7z/zip. Paint.net silent install arguments do work, but the ones that set the file type associations do not work in Windows 10. (again, only added to the context menu "Open With..." not the context menu "edit". In win7 it worked flawlessly).
 -
 Hi Everyone, I have created an unattended file which auto-joins to the domain, but it still prompts me to create a local user account. How can this part be skipped? I know you can use the firstlogon commands to delete the account, but I was wondering if there was a way to do it without even creating the account? Thanks Jonny
 -
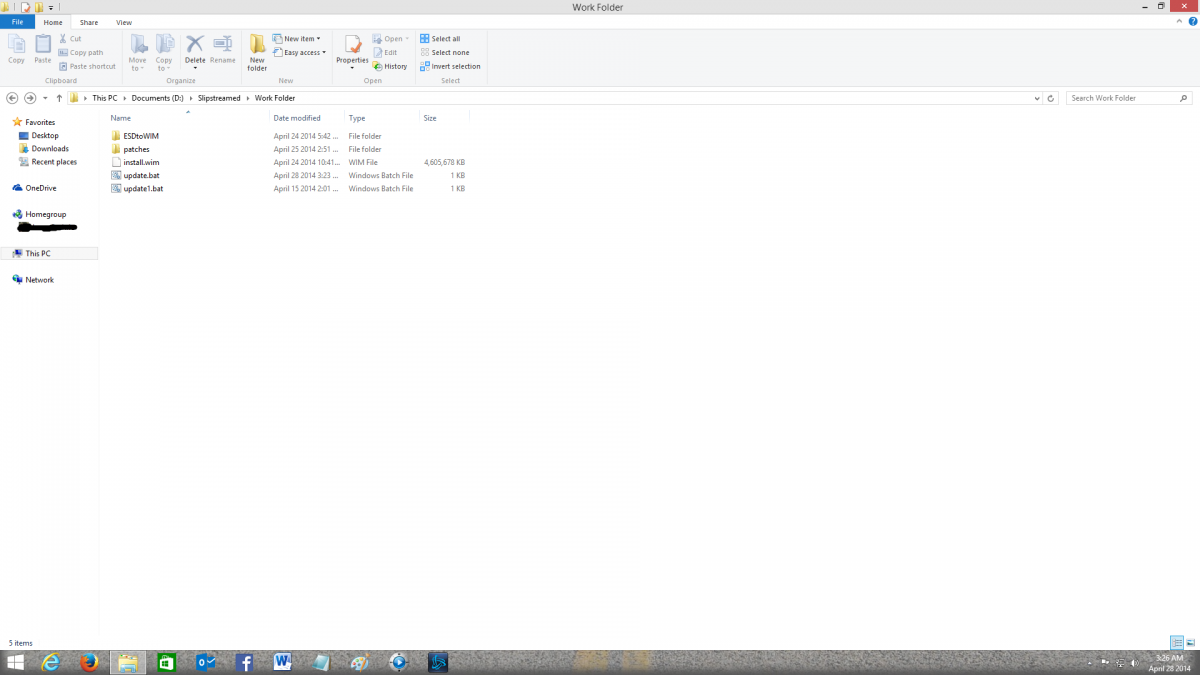
 Easy and detailed instructions. This is better than those Automated Apps like WinReducer and Win Toolkit which usually are buggy. Here you Right click the batch file and choose to run as Admin and then go have coffee. It's that easy. Attached photo is the folder structure to what we will create. This guide will slipstream all updates and clean up the image and convert the image to and from ESD<--->WIM Prepare and Slipstream Updates In to a Windows 8.1 .wim or .esd Image (Including Update 1) What you need: install.wim image file from the Windows installation media. If it is an install.esd image file then you can read the instructions on page 3 of this guide to convert it to an install.wim image file or create a Virtual Machine to do it (See page 4). Your install.wim or install.esd file is in the “Sources” folder which is found in the Windows Installation Media.2 batch files called update.bat and udate1.bat (Batch Commands are on this page)Windows updates downloader: http://www.windowsupdatesdownloader.com/ProgramFiles.aspxYour main computer that you will perform this task on should be Windows 8.1. You will need to Install Windows ADK for Windows 8.1 which is found here: http://technet.microsoft.com/en-us/library/dn247001.aspx. Attached picture is the folder structure. Batch File Commands to inject the 40+ updates for update.bat MD %~dp0WIN8 "c:\program files (x86)\windows kits\8.1\assessment and deployment kit\deployment tools\amd64\dism\Dism.exe" /Mount-Wim /WimFile:%~dp0install.wim /Index:1 /MountDir:%~dp0WIN8 "c:\program files (x86)\windows kits\8.1\assessment and deployment kit\deployment tools\amd64\dism\Dism.exe" /image:%~dp0WIN8 /Add-Package /PackagePath:"%~dp0patches" "c:\program files (x86)\windows kits\8.1\assessment and deployment kit\deployment tools\amd64\dism\Dism.exe" /image:%~dp0WIN8 /Get-Packages | more "c:\program files (x86)\windows kits\8.1\assessment and deployment kit\deployment tools\amd64\dism\Dism.exe" /Image:%~dp0WIN8 /Cleanup-Image /StartComponentCleanup /ResetBase pause "c:\program files (x86)\windows kits\8.1\assessment and deployment kit\deployment tools\amd64\dism\Dism.exe" /Unmount-Wim /MountDir:%~dp0WIN8 /commit Batch File Commands to inject Update 1 for update1.bat MD %~dp0WIN8 "c:\program files (x86)\windows kits\8.1\assessment and deployment kit\deployment tools\amd64\dism\Dism.exe" /Mount-Wim /WimFile:%~dp0install.wim /Index:1 /MountDir:%~dp0WIN8 "c:\program files (x86)\windows kits\8.1\assessment and deployment kit\deployment tools\amd64\dism\Dism.exe" /image:%~dp0WIN8 /Add-Package /PackagePath:"%~dp0patches" "c:\program files (x86)\windows kits\8.1\assessment and deployment kit\deployment tools\amd64\dism\Dism.exe" /image:%~dp0WIN8 /Get-Packages | more pause "c:\program files (x86)\windows kits\8.1\assessment and deployment kit\deployment tools\amd64\dism\Dism.exe" /Unmount-Wim /MountDir:%~dp0WIN8 /commit Instructions (Page 2) We need to Download the zip file named ‘Tools U Need” from my OneDrive and extract it, it will create the folder and files structure for you. Don’t modify the file or folder names with the exception of the main folder, which can be named to whatever you want. Skip to step 4 when completed. The Batch files will already be created. OneDrive address: https://onedrive.live.com/redir?resid=FF876747A444836D%2115004 To manually create the folder structure you need to make a folder and name it to whatever you like. Open that folder and create another folder and name it: patches If you need to convert install.esd to install.wim you will need to unzip the “Tools U Need” zip file and copy and paste the ESDtoWIM folder and its contents to the folder you created. It should also be outside the patches folder. Make 2 blank text files and name each file update.bat and update1.bat. Now copy and paste the text for each batch file command from page 1 into the corresponding file. Update.bat is for the 40+ updates and update1.bat is for update 1. Place these to batch files outside the patches folder. Copy your install.wim file to the folder that was created, which will be outside the patches folder, “NOT” in the patches folder. If the original file was a .esd file then see my instructions to convert the install.esd to install.wim.. Now all you need is the updates that you will download from the “Windows Update Downloader”. Download the update list from this page: http://www.windowsupdatesdownloader.com/UpdateLists.aspx (It’s a small file). Once finished downloading you need to Double Click it to add the list to the Windows Updates Downloader. Start the Windows Update Downloader, choose the operating system update list In the Windows updates Downloader, and then choose the Security Updates, Non-Security Updates and both versions of .Net Framework. Updates in the Optional folder won’t work. Start the download. All updates MUST be in the .msu format. Once the updates are downloaded, you need to copy and paste all the updates in to the “patches” folder. Make sure that you only copy the updates to the patches folder. In other words, there should be NO folders inside the patches folder. Only .msu (update) files can be in the patches folder. You can delete the ESDtoWIM folder if you are not going to use the command line tool to convert install.esd to install.wim. Now, the Structure of the folder you are working in should have only 5 items: An ”ESDtoWIM” folder, a “patches folder”, update.bat file, update1.bat file and an “install.wim” file. All .msu updates should be in the patches folder. Now Right click the update.bat file and choose to run as Administrator. Once it installs all the updates it will ask you to hit any key. Hit any key until is shows all the updates and continues. You will have to hit any key many times until it begins the last phase. Once it is finish, you can repeat step 7 through 9 but use the update1.bat file for the Windows 8.1 update 1 .msu files (There are 6 needed downloading). Once everything is finished then you can replace the old install.wim file in the Windows install media with the new one. Again, if the original was an install.esd file then it needs to be converted first to install.wim file.File Conversion Instructions (Page 3) Convert install.esd to install.wim From the “Tools U Need” folder which can be downloaded here: https://onedrive.live.com/redir?resid=FF876747A444836D%2115004, find and open the ESDtoWIM folder Right click the file named ESD2WIM.cmd and choose “Run As Administrator” Copy and paste (or type) the complete path location of the install.esd file. Example: C:\Work Folder\install.esd Press the enter key and wait for the process to finish. The location of the install.wim file will be in the “C” drive when the process finishes. C:\install.wim Continue with step 4 on the instructions page (Page 2).Convert install.wim to install.esd If the original file was an install.esd file then you will need to convert the install.wim file back to an install.esd file. Before we begin, make sure there is no file in C:\ called install.esd. In other words delete any file in this exact path C:\install.esd Copy the install.wim file to the C:\ directory. Example: C:\install.wim Click “Start” and do a search by typing: cmd Look for a file called cmd.exe in the search results. Right click cmd.exe and choose to “Run as Administrator” A black box will open. In the black box, Copy and paste the command in step 6 below and then hit the enter key. dism /Export-Image /SourceImageFile:"C:\install.wim" /SourceIndex:1 /DestinationImageFile:"C:\install.esd" /Compress:recovery It will take a very long time and a lot of processing during the conversion. So have patients. When it’s finished you will find the file called install.esd at this location C:\install.esd JJJCongratulationsJJJ You have completed the process of slipstreaming Windows updates and update 1 in to Windows 8.1 Install media. J Good luck J Installing Windows 8.1 to a VHD and using imageX to capture back the image as install.wim (Page 4) If you prefer not to use the command to convert the install.esd file to an install.wim file then you can create a virtual machine and install windows 8.1 in to it and then capture the VHD image back to an install.wim file. Here is how you do it. What you need: Windows 8.1 ISO, DVD or USB stick made bootable with Windows 8.1Microsoft Hyper-V (included as an add-on in Windows 8.1 Pro) or Virtual BoxFor Windows 8.0 serial key users: These generic keys will allow the correct version of Windows 8.1 to be installed. You will HAVE TO activate with your purchased Windows 8.0 key once all is installed. It will work 100%.334NH-RXG76-64THK-C7CKG-D3VPT for Non-Pro versionXHQ8N-C3MCJ-RQXB6-WCHYG-C9WKB for Pro versionKnowledge of these Virtual machinesImageX which comes with the Windows ADK for Windows 8.1Knowledge of the CMD command prompt.Knowledge of “SysPrep”Instructions Create a Virtual disk. The disk should be either VHD or VHDX Install Windows 8.1 in the virtual machine Press Ctrl + Shift + F3 when the Installation gets to the screen where you create a computer name. This will log you in automatically as the Administrator and start the SysPrep process. In the SysPrep preparation tool, make sure you choose “Enter system out of box experience”, and then check the box that says “Generalize”. The next drop-down menu: choose “Shutdown”. Click OK and the Virtual machine will shut down when finished. Now locate where the Virtual Disk that has Windows 8.1 installed on it. Mount that drive and give it a drive letter Make sure you installed ImageX which comes with the Windows ADK for Windows 8.1 Click the Start button and type cmd for command prompt. In the search results choose “Deployment and Imaging Tools Environment”. A command black box will open. Type the following: imagex /compress maximum /capture F:\ C:\install.wim "Windows 8.1 Pro" (F is the drive letter you gave the virtual drive when you mounted it, change it to whatever it is) Hit Enter and wait for it to finish. Look in the C drive where you copied the virtual drive and you will also see the install.wim file. This is the file you need to inject all those updates in to. You can now delete the Virtual drive and the ESD file.
-
Yesterday I proceeded to make an customized & modernized Windows 2000 installation. Since i'm hungarian, I used the Hungarian version of Windows 2000 Pro SP4. I extracted the contents of the ISO into a folder using MagicISO, copied the files I wanted to edit in a seperate folder, extracted them using Universal Extractor, edited them with Resource Hacker, then used Camtech's MakeCab 4-Win (MakeCab with graphical interface) to package the files. I copied them into i386, used nLite to integrate Windows Media Player 7 and to make a bootable ISO. I then went into Virtual PC 2007 (I also have VMWare, I use that more, but I used Virtual PC because... I wanted to) and installed the OS. The graphics were changed as I changed it, the WMP7 installer appeared halfway the installation. I installed WMP7, and when the install was done, and the login screen appeared (with my graphics), I logged into the OS, but the desktop and the taskbar didn't appear. I was weirded out by this, and I opened Task Manager, and tried to open Explorer.exe, but when I did, Explorer.exe still didn't appear. I tried a lots of things, like using ModifyPE (for safety's sake ), not installing WMP7, repacking the ISO with n-Lite multiple times. I installed a vanilla Windows 2000 inside Virtual PC, put my customized files in a seperate folder, with Replacer, and replaced all the files in Safe Mode with my customized ones, and I basically got the same result. I reinstalled the OS, and tried to replace the files seperately, starting with browseui.dll, and when I did, and rebooted, explorer.exe didn't appear. I realized what was the problem, browseui.dll. After using the Recovery Console, I replaced user32.dll, and I got the XP error icons and start buttons from my customization (which worked in the customization), then shell32.dll, and I got my XP icons (with the Whistler recycle bin and favorites icons), and my new about logo. Out of curiosity I replaced the BROWSEUI.DL_ from the customized ISO with the one from a vanilla Windows 2000, and after installation, the OS worked. But I really want my browseui.dll inside the OS, which has some of the icons replaced with Windows 7 ones, with the back/forward/up icons from IE9/IE10/IE11 and the throbber from XP, only with a black background (inverted and then adjusted the hue in Photoshop). Is there a way to fix the customized browseui.dll? It's still not done, the control panel icons, the Please Wait dialog from setup, and the autorun need to be modified.
-
 Hello all. Just wondering if anyone can shed any light on my current quandry....I'm doing a spot of customisation and I'd like to rename the Windows directory. I was able to accomplish this in Windows XP by using: [SetupData]DefaultPath=\WinXP...in TXTSETUP.SIF, but I can't find the equivalent functionality in Windows 7's install process. I have a similar problem with the "Program Files" directories. In XP's setup I was able to alter those using: [Unattended]ProgramFilesDir="\Local"CommonProgramFilesDir="\Local\Common Files"...in WINNT.SIF, but again, I can't find the equivalent functionality in Windows 7's install process. At least with the latter you can copy them, edit the registry and then delete the orignals. Not exactly an option with the system directory though. My other avenue of enquiry is to make the changes into the WIM directly - rename the folders there and update the registry hives with the updated paths rather than trying to script the changes. The main hiccup I foresee is the bootloader probably generating the initial listing with the default path rather than looking up anything in the registry...anyone tried this already? I know I could just hard link the names I want to the directories default names and then hide the default directories, but I do a lot of system-level work, so running with hidden files & directories isn't really an option for me.
 -
Latest UDC (12/10/13) gives an error message while executing it: File is corrupt or invalid. Is it just me? Regaeds, Gideon.
-
Hi Just trying to piece together a very basic answer file that asks for "computer name" & "licence key" and nothing else. I pieced together this but it error'd all over the shop (not during sysprep but during build) Any tips would be amazing. Thanks <?xml version="1.0" encoding="utf-8"?><unattend xmlns="urn:schemas-microsoft-com:unattend"> <settings pass="specialize"> <component name="Microsoft-Windows-Deployment" processorArchitecture="amd64" publicKeyToken="31bf3856ad364e35" language="neutral" versionScope="nonSxS" xmlns:wcm="http://schemas.microsoft.com/WMIConfig/2002/State" xmlns:xsi="http://www.w3.org/2001/XMLSchema-instance"> <RunSynchronous> <RunSynchronousCommand wcm:action="add"> <Order>1</Order> <Path>net user administrator /active:yes</Path> </RunSynchronousCommand> </RunSynchronous> </component> </settings> <settings pass="oobeSystem"> <component name="Microsoft-Windows-Shell-Setup" processorArchitecture="amd64" publicKeyToken="31bf3856ad364e35" language="neutral" versionScope="nonSxS" xmlns:wcm="http://schemas.microsoft.com/WMIConfig/2002/State" xmlns:xsi="http://www.w3.org/2001/XMLSchema-instance"> <OOBE> <HideEULAPage>true</HideEULAPage> <HideWirelessSetupInOOBE>true</HideWirelessSetupInOOBE> <NetworkLocation>Work</NetworkLocation> <ProtectYourPC>1</ProtectYourPC> <SkipMachineOOBE>true</SkipMachineOOBE> <SkipUserOOBE>true</SkipUserOOBE> </OOBE> <UserAccounts> <AdministratorPassword> <Value>TgAwAHQANgA0AGIAMQB0ACEAQQBkAG0AaQBuAGkAcwB0AHIAYQB0AG8AcgBQAGEAcwBzAHcAbwByAGQA</Value> <PlainText>false</PlainText> </AdministratorPassword> </UserAccounts> </component> </settings> <cpi:offlineImage cpi:source="catalog:d:/sources/install_windows 7 enterprise.clg" xmlns:cpi="urn:schemas-microsoft-com:cpi" /></unattend>
-
 I have windows 7 ultimate that i bought last year, and now i want to format my computer but i want to make an unattended version for my one and to include the security updates on that version. Is there a place that i can find and download easly windows 7 updates? I search on microsoft windows 7 update and find this: http://search.microsoft.com/en-us/DownloadResults.aspx?q=Security%20Update%20for%20Windows%207&ftapplicableproducts=%5eWindows&first=241&FORM=PEME8 I search for updates that start from 1.5.2012 until today. How and where can i easly find and download them? Where can i find them?